
Page Transformations for A/B tests and personalization
Page Transformations is an experience type that lets you modify any element on your pages, including CTAs, headlines, layouts, and colors, then target those changes to specific audience segments. No code required.

Page Transformations combines two capabilities: experimentation (test variations to find what works) and personalization (deliver tailored experiences to the right audience). Select an element, apply a transformation, define who sees it, and measure what drives results.
Use cases
Section titled “Use cases”Experimentation
Section titled “Experimentation”Test variations on a portion of your traffic to find what converts:
-
CTA optimization: Test button colors, text, size, or position. Compare “Subscribe Now” vs. “Get Started Free”. Small copy changes often yield 10-30% conversion lifts.
-
Visual hierarchy testing: Reposition elements to test what users see first. Move subscription CTAs above the fold for half your audience and measure the impact.
-
Style and color variations: Test color psychology with controlled experiments. Red vs. green buttons. Bold vs. subtle treatments.
Personalization
Section titled “Personalization”Deliver tailored experiences to specific audience segments:
-
Returning visitor experiences: Show different CTAs to first-time visitors vs. returning readers. New visitors see “Start your free trial” while loyal readers see “Upgrade to Premium.”
-
Geographic personalization: Display region-specific promotions or content. Show localized offers to users in specific markets without creating separate pages.
-
Behavioral targeting: Customize experiences based on user behavior. Readers who’ve visited pricing pages see streamlined subscription CTAs.
-
Promotional campaigns: Inject targeted banners for specific segments. Show seasonal offers to high-intent users without cluttering the experience for everyone.
How to select an element
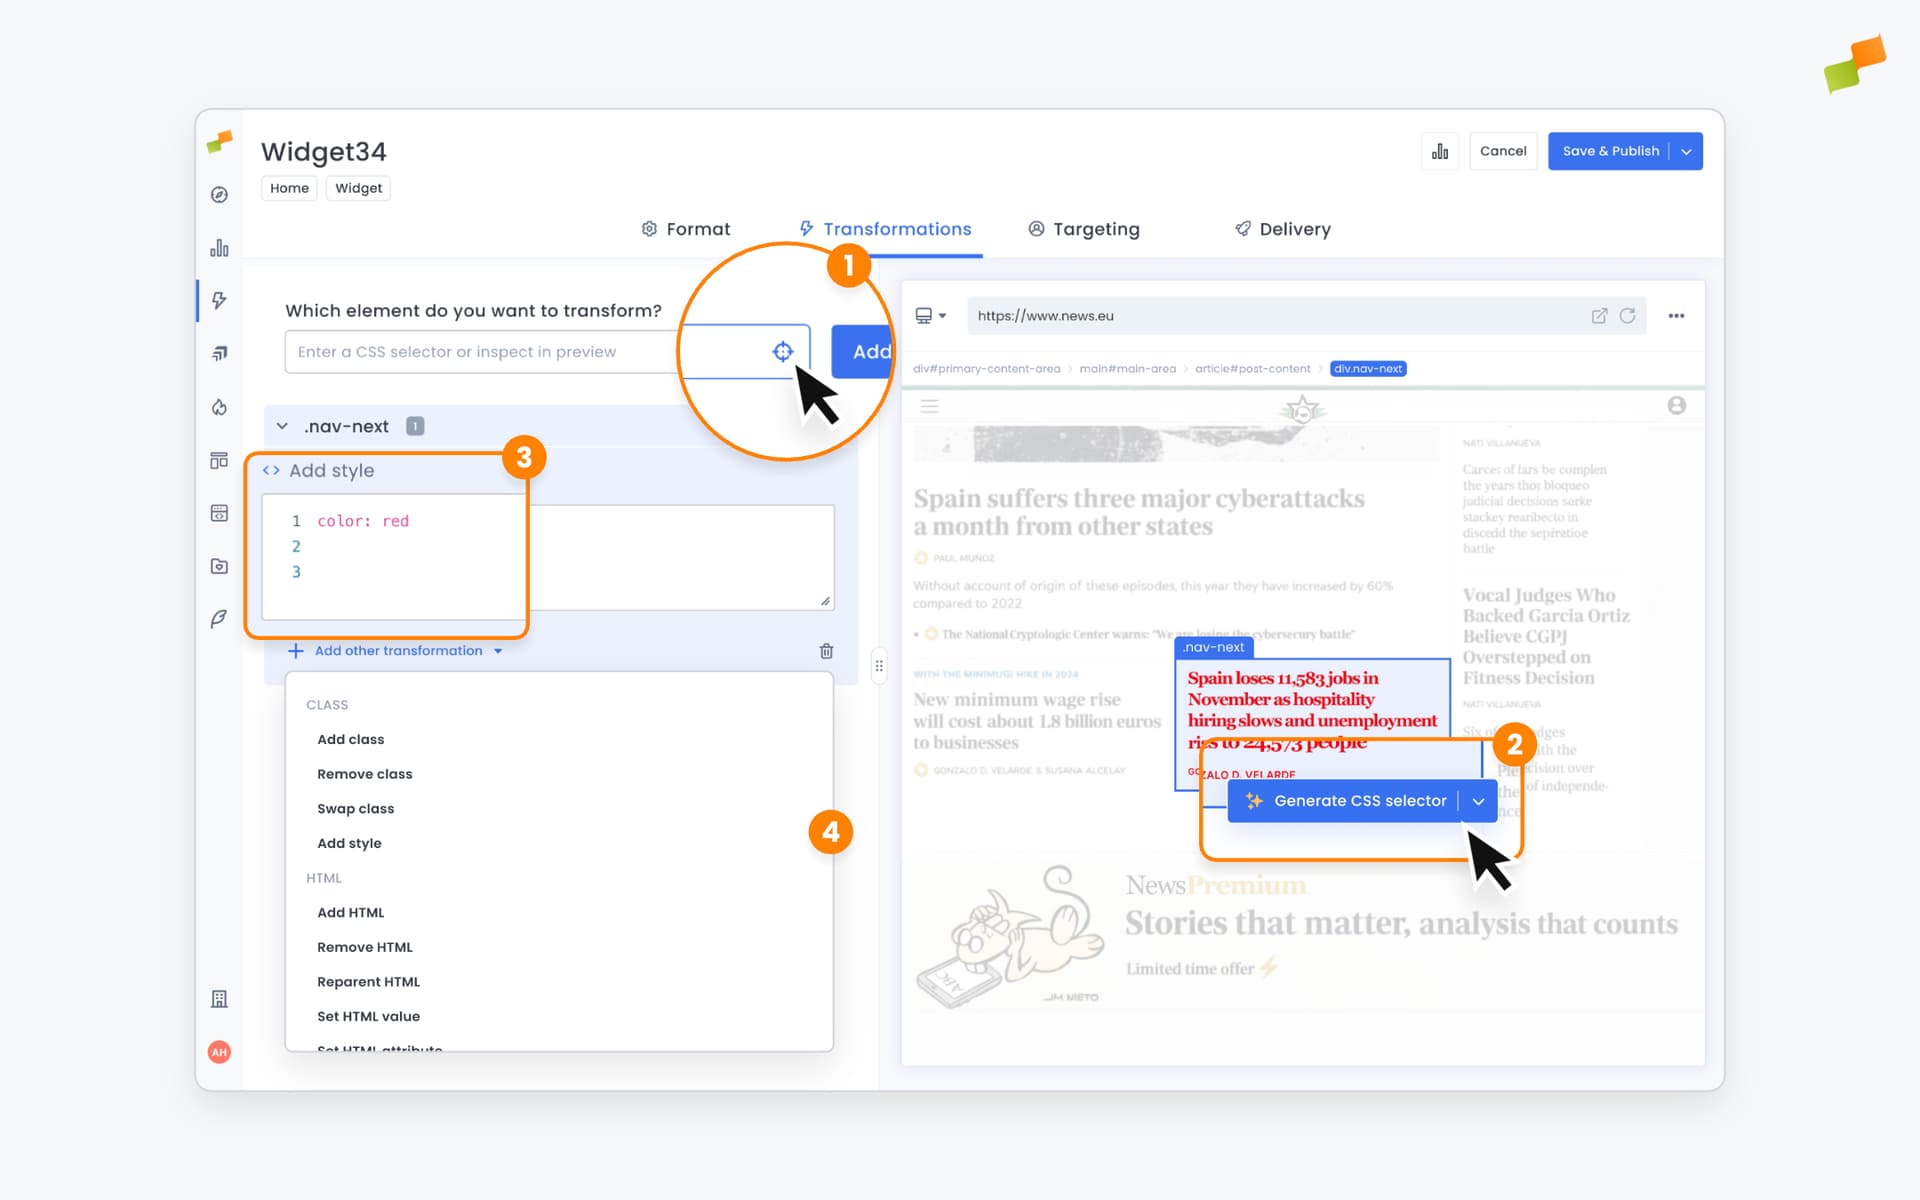
Section titled “How to select an element”The ExperienceManager editor supports three selection methods:
- Point and click: Enter a URL in the preview panel, then click the locator icon and click directly on any element in the preview. The element highlights and appears in the left panel. Use the Generate button to get AI assistance for creating the CSS selector.
-
CSS selector: Enter a CSS selector (like
.nav-nextor#header) in the selector field and click Add. -
XPath selector: Enter an XPath expression in the same selector field and click Add. Any expression starting with
/or.//is automatically recognized as XPath, no configuration needed.
The breadcrumb trail at the top of the preview (e.g., body > main > div.content) shows your position in the page hierarchy. You can use it to select parent elements.
The number badge next to each element (e.g., “.nav-next 5”) indicates how many instances match that selector across the page.
Available transformations
Section titled “Available transformations”Once you select an element, expand it to reveal options. Click + Add transformation to see all available types, organized by category.
Class transformations
Section titled “Class transformations”Add class
Section titled “Add class”Add a style class to the element without removing existing ones. Enter the class name (e.g., .highlight).
Remove class
Section titled “Remove class”Remove a style class from the element. Select the class to remove from the dropdown.
Swap class
Section titled “Swap class”Replace one style class with another. Select the Source class to remove, then enter the Target class to add.
Add style
Section titled “Add style”Apply inline CSS styles directly to the element. Enter style declarations (e.g., color: red; font-size: 18px;).
HTML transformations
Section titled “HTML transformations”Insert HTML before
Section titled “Insert HTML before”Add content immediately before the selected element. Write or paste your code in the editor.
Insert HTML inside
Section titled “Insert HTML inside”Add content within the selected element. Write or paste your code in the editor.
Insert HTML after
Section titled “Insert HTML after”Add content immediately after the selected element. Write or paste your code in the editor.
Remove HTML
Section titled “Remove HTML”Remove the selected element from the page entirely.
Reparent HTML
Section titled “Reparent HTML”Move the selected element to a different location in the page structure. Specify the new parent element.
Replace content
Section titled “Replace content”Replace the inner content of an element with new text or HTML. Enter the replacement content in the field.
Set HTML attribute
Section titled “Set HTML attribute”Add or modify an attribute on the element. Enter the attribute name and value (e.g., href, data-tracking).
Important: HTML transformations execute in the visitor’s browser. Test thoroughly to ensure changes don’t break page functionality or layout.
Combining transformations
Section titled “Combining transformations”You can stack multiple transformations on a single element. They apply in the order listed.
Example workflow:
- Select
.cta-button - Add class:
.variant-a - Replace content: “Subscribe Now”
- Add style:
background-color: #FF6B00;
Click the - icon next to any transformation to remove it or the trash icon to delete all transformations for a selector.
Using selectors without transformations
Section titled “Using selectors without transformations”You can add a selector to an experience without applying any transformation. This tags matching elements for measurement without modifying them.
Use this when you want to observe whether a transformation of an element impacts the performance of a different recirculation module.
Going deeper
Section titled “Going deeper”- Experience Manager Overview: The four-tab editor walkthrough.
- Delivery & Scheduling
- Triggers
- Targeting
- A/B Testing
- Blueprints
- Inline: DOM injection, CSS selector placement, and visual element selector.
- Popups: Modal vs contextual modes, position, triggers, and orchestration.
- Flowcards: Isolated AMP rendering, snap points, card icons, and browser history integration.
- Tag Experiences: SDK configuration for tracking, integrations, and third-party tools.
- Recommender: Configure recommendation engines and layouts.
- Page Transformations
- Testing and Troubleshooting: Preview, live test, and debug your experiences.
- Web Activation: How the SDK delivers experiences on your site.
- AMP Activation: Run Flowcards on AMP pages.
What can I do with Page Transformations?
Page Transformations lets you modify any element on your pages, including CTAs, headlines, layouts, and colors, then target those changes to specific audience segments. It supports both A/B experimentation and personalization without code.
How do I select an element in the ExperienceManager editor?
You can select elements in three ways: point and click on the preview, enter a CSS selector, or enter an XPath expression. The editor auto-detects XPath when the expression starts with / or .//.
Can I apply multiple transformations to the same element?
Yes. You can stack multiple transformations on a single element. They apply in the order listed. Use the minus icon to remove individual transformations or the trash icon to delete all transformations for a selector.