
Manage experiences with filters, tags, and cloning
The Experiences list is your central hub for finding, filtering, and managing all experiences in your account. Navigate to Experiences in the Marfeel Hub sidebar to access the list view.
Experience status indicators
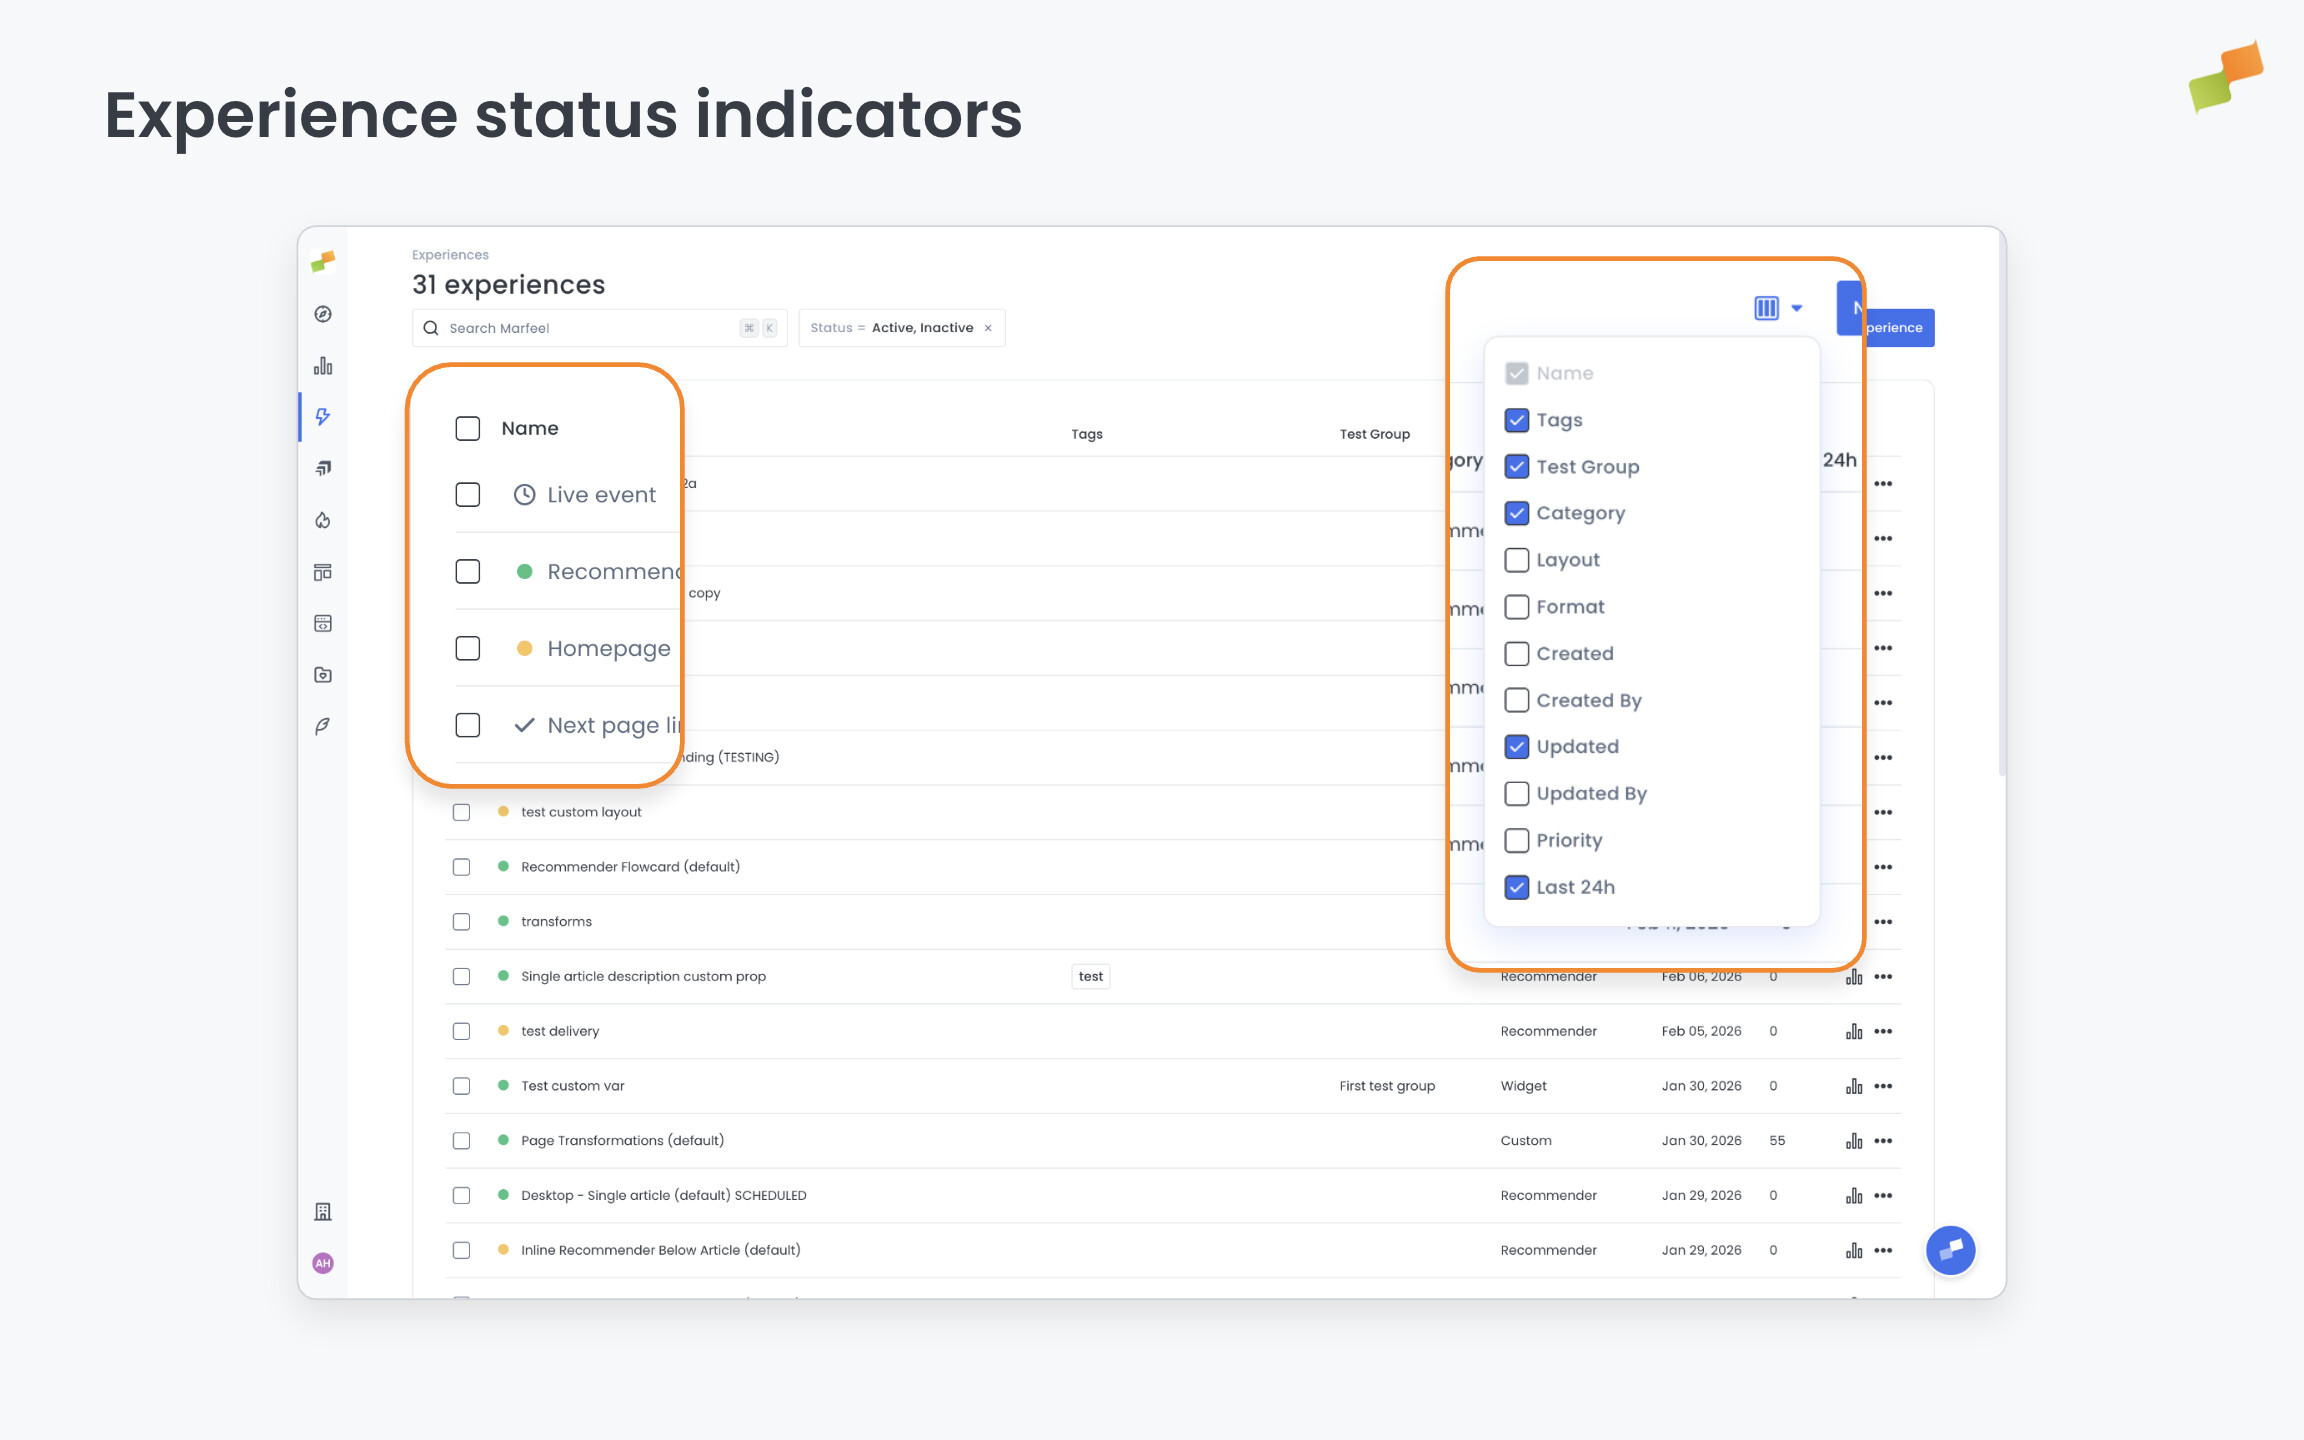
Section titled “Experience status indicators”Each experience displays a colored status indicator (bullet) showing its current state:
| Color | Status | What it means |
|---|---|---|
| Green | Active | Experience is live and delivering to users |
| Orange | Inactive | Experience is paused and not delivering |
| Schedule icon | Scheduled | Experience has a future start date configured |
| Tick icon | Completed | Experience was scheduled has has been delivered |
| Black | Archived | Experience has been archived and is no longer active |
The status appears as a colored bullet to the left of the experience name, making it easy to scan active vs. inactive experiences at a glance.
Automatic archiving
Section titled “Automatic archiving”Inactive experiences are automatically archived after 14 days. This keeps your experience list clean and focused on active campaigns. Archived experiences can still be accessed by adjusting the status filter.
Impression cycles after reactivation
Section titled “Impression cycles after reactivation”Frequency capping is tracked per period (weekly, monthly), not per activation. If a user has already seen an experience during a period, they will not see it again until the next period starts — regardless of whether the experience was deactivated and reactivated in the meantime.
Example: A user sees an experience capped at 1 impression per month on October 20. Even if the experience is deactivated and reactivated on October 25, that user will not see it again until November.
OmniSearch: Intelligent filtering
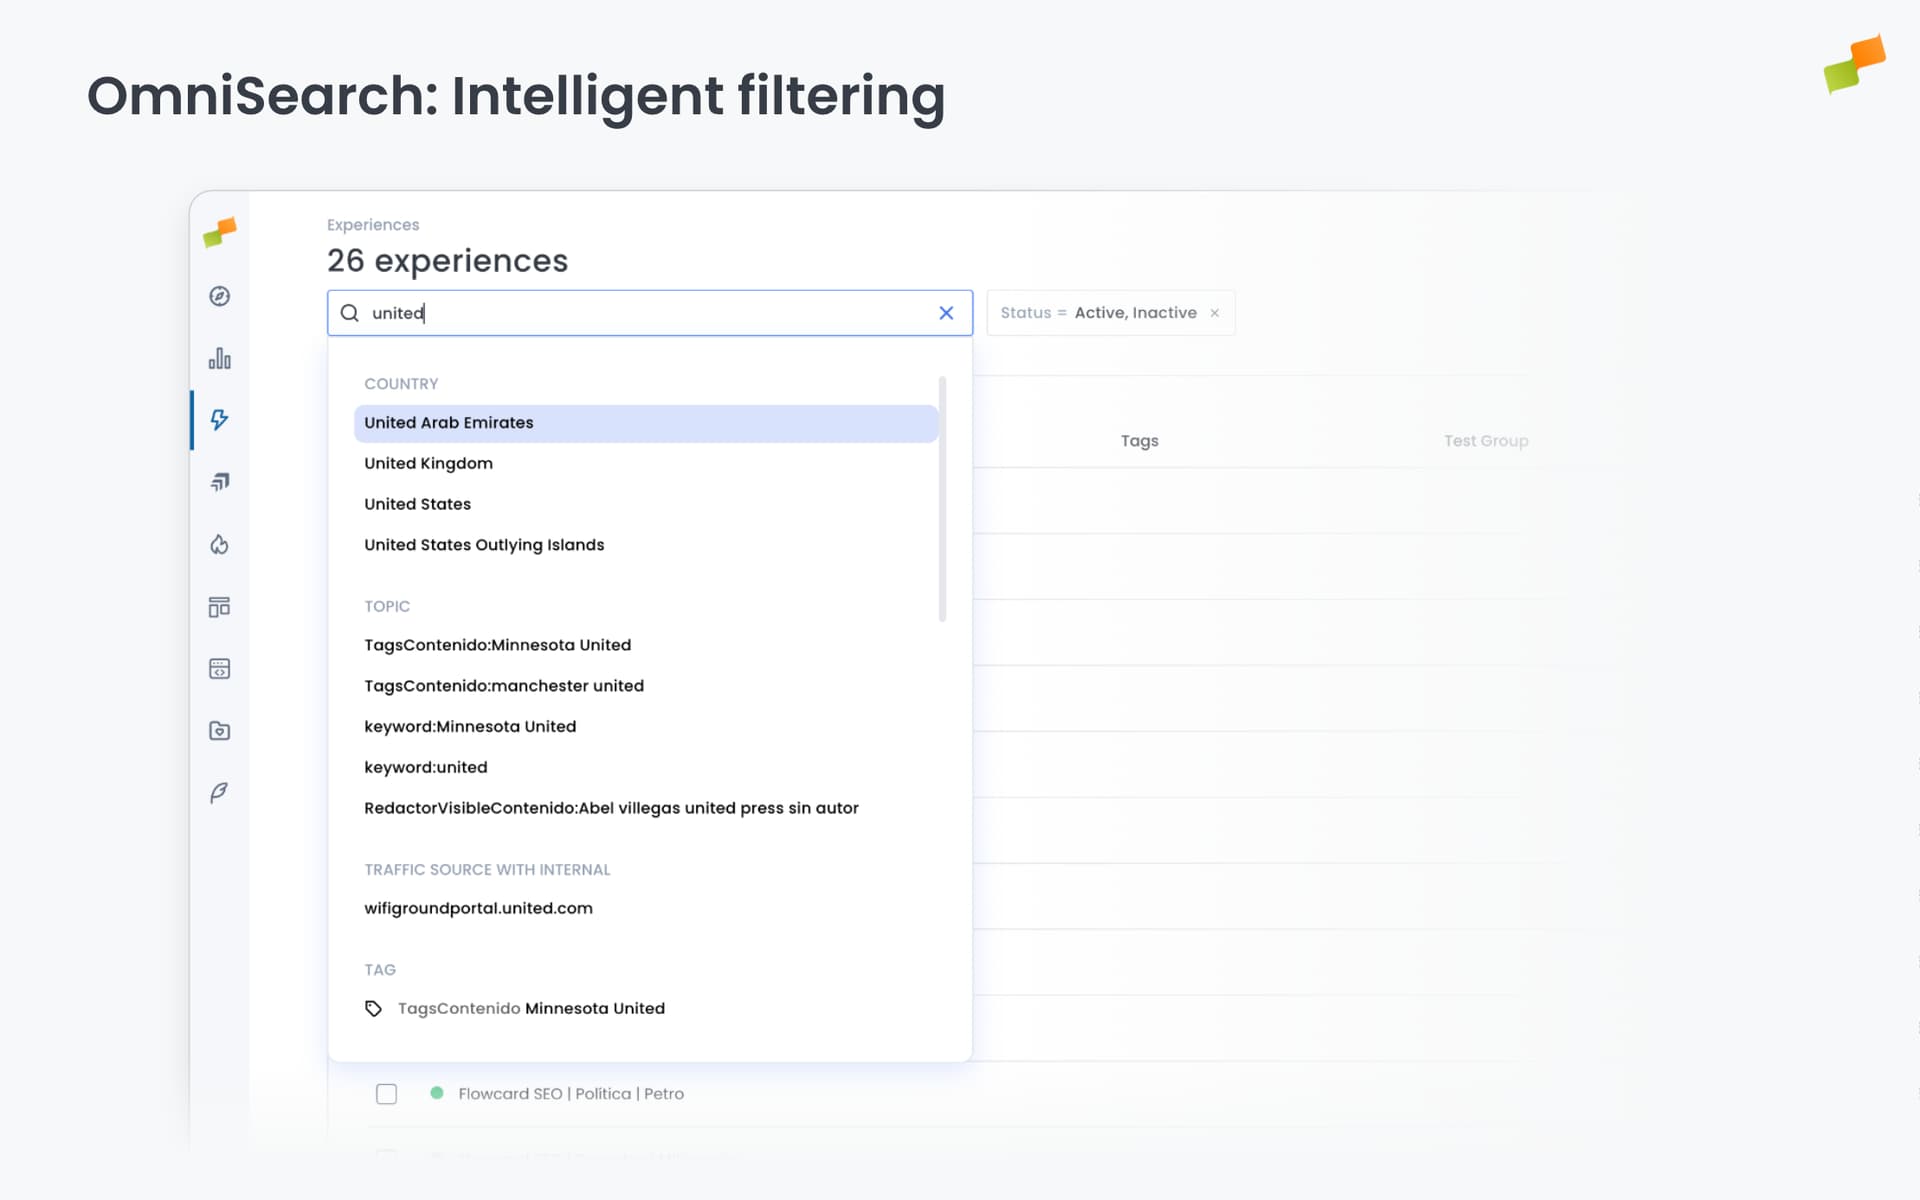
Section titled “OmniSearch: Intelligent filtering”OmniSearch automatically detects what you are searching for, so you do not need to specify which field to query. Type any term into the search bar at the top of the experience list and the system suggests matching filters instantly.
How OmniSearch works
Section titled “How OmniSearch works”Type anything: Enter any search term, including country names, experience names, tags, test groups, or other attributes.
Automatic detection: The system analyzes your input and suggests relevant filters. For example:
- Type “Argentina”: the system detects this is a country and offers to filter by Country = Argentina
- Type “test custom”: the system detects this matches experience names and shows matching experiences under Name
Smart filtering: When you select a suggested filter or press Enter, only experiences matching that criteria are displayed. For geographic filters like countries, the list shows experiences that:
- Target users from that country (configured in the Targeting tab)
- Will be shown to users connecting from that country
Searchable dimensions
Section titled “Searchable dimensions”OmniSearch can detect and filter by multiple dimensions:
Experience attributes:
- Name: Experience title
- Tags: Custom tags assigned to experiences
- Test Group: A/B test group assignments
- Category: Blueprint category (Recommender, Custom, Widget, Setup, etc.)
- Format: Experience format (Flowcard, Inline, Popup, Tag, etc.)
- Layout: Layout template used
- Created By: User who created the experience
- Updated By: User who last modified the experience
- Priority: Delivery priority value
- Status: Active, Inactive, Scheduled, Archived
Targeting dimensions:
- Country: Geographic targeting
- First test group: Test group dimension
- Any other targeting dimension configured in your experiences
Quick open behavior
Section titled “Quick open behavior”Single result shortcut: If your search returns a single experience and you press Enter or click the experience name in the dropdown, the experience opens directly in the editor. This provides fast access to specific experiences when you know the name.
Example workflow:
- Type “test custom layout” in the search bar
- System shows matching experiences under “Name”
- Press Enter or click the experience
- Experience opens in the editor
Customizable columns
Section titled “Customizable columns”Click the table settings icon (grid icon) next to the New experience button to choose which columns appear in the experience list.
Available columns: Name, Tags, Test Group, Category, Format, Layout, Created, Created By, Updated, Updated By, Priority, Last 24h, Status.
Check or uncheck columns to customize your view. Changes apply immediately.
Clickable tags for quick filtering
Section titled “Clickable tags for quick filtering”When the Tags column is visible, click any tag to instantly filter the list to show only experiences with that tag. The tag appears as an active filter chip above the list. Click the X on the chip to remove the filter.
Targeting filter mode
Section titled “Targeting filter mode”The experience list header includes a toggle that controls how targeting filters are applied. Switch between two modes depending on whether you want to inspect what is configured or what is live.
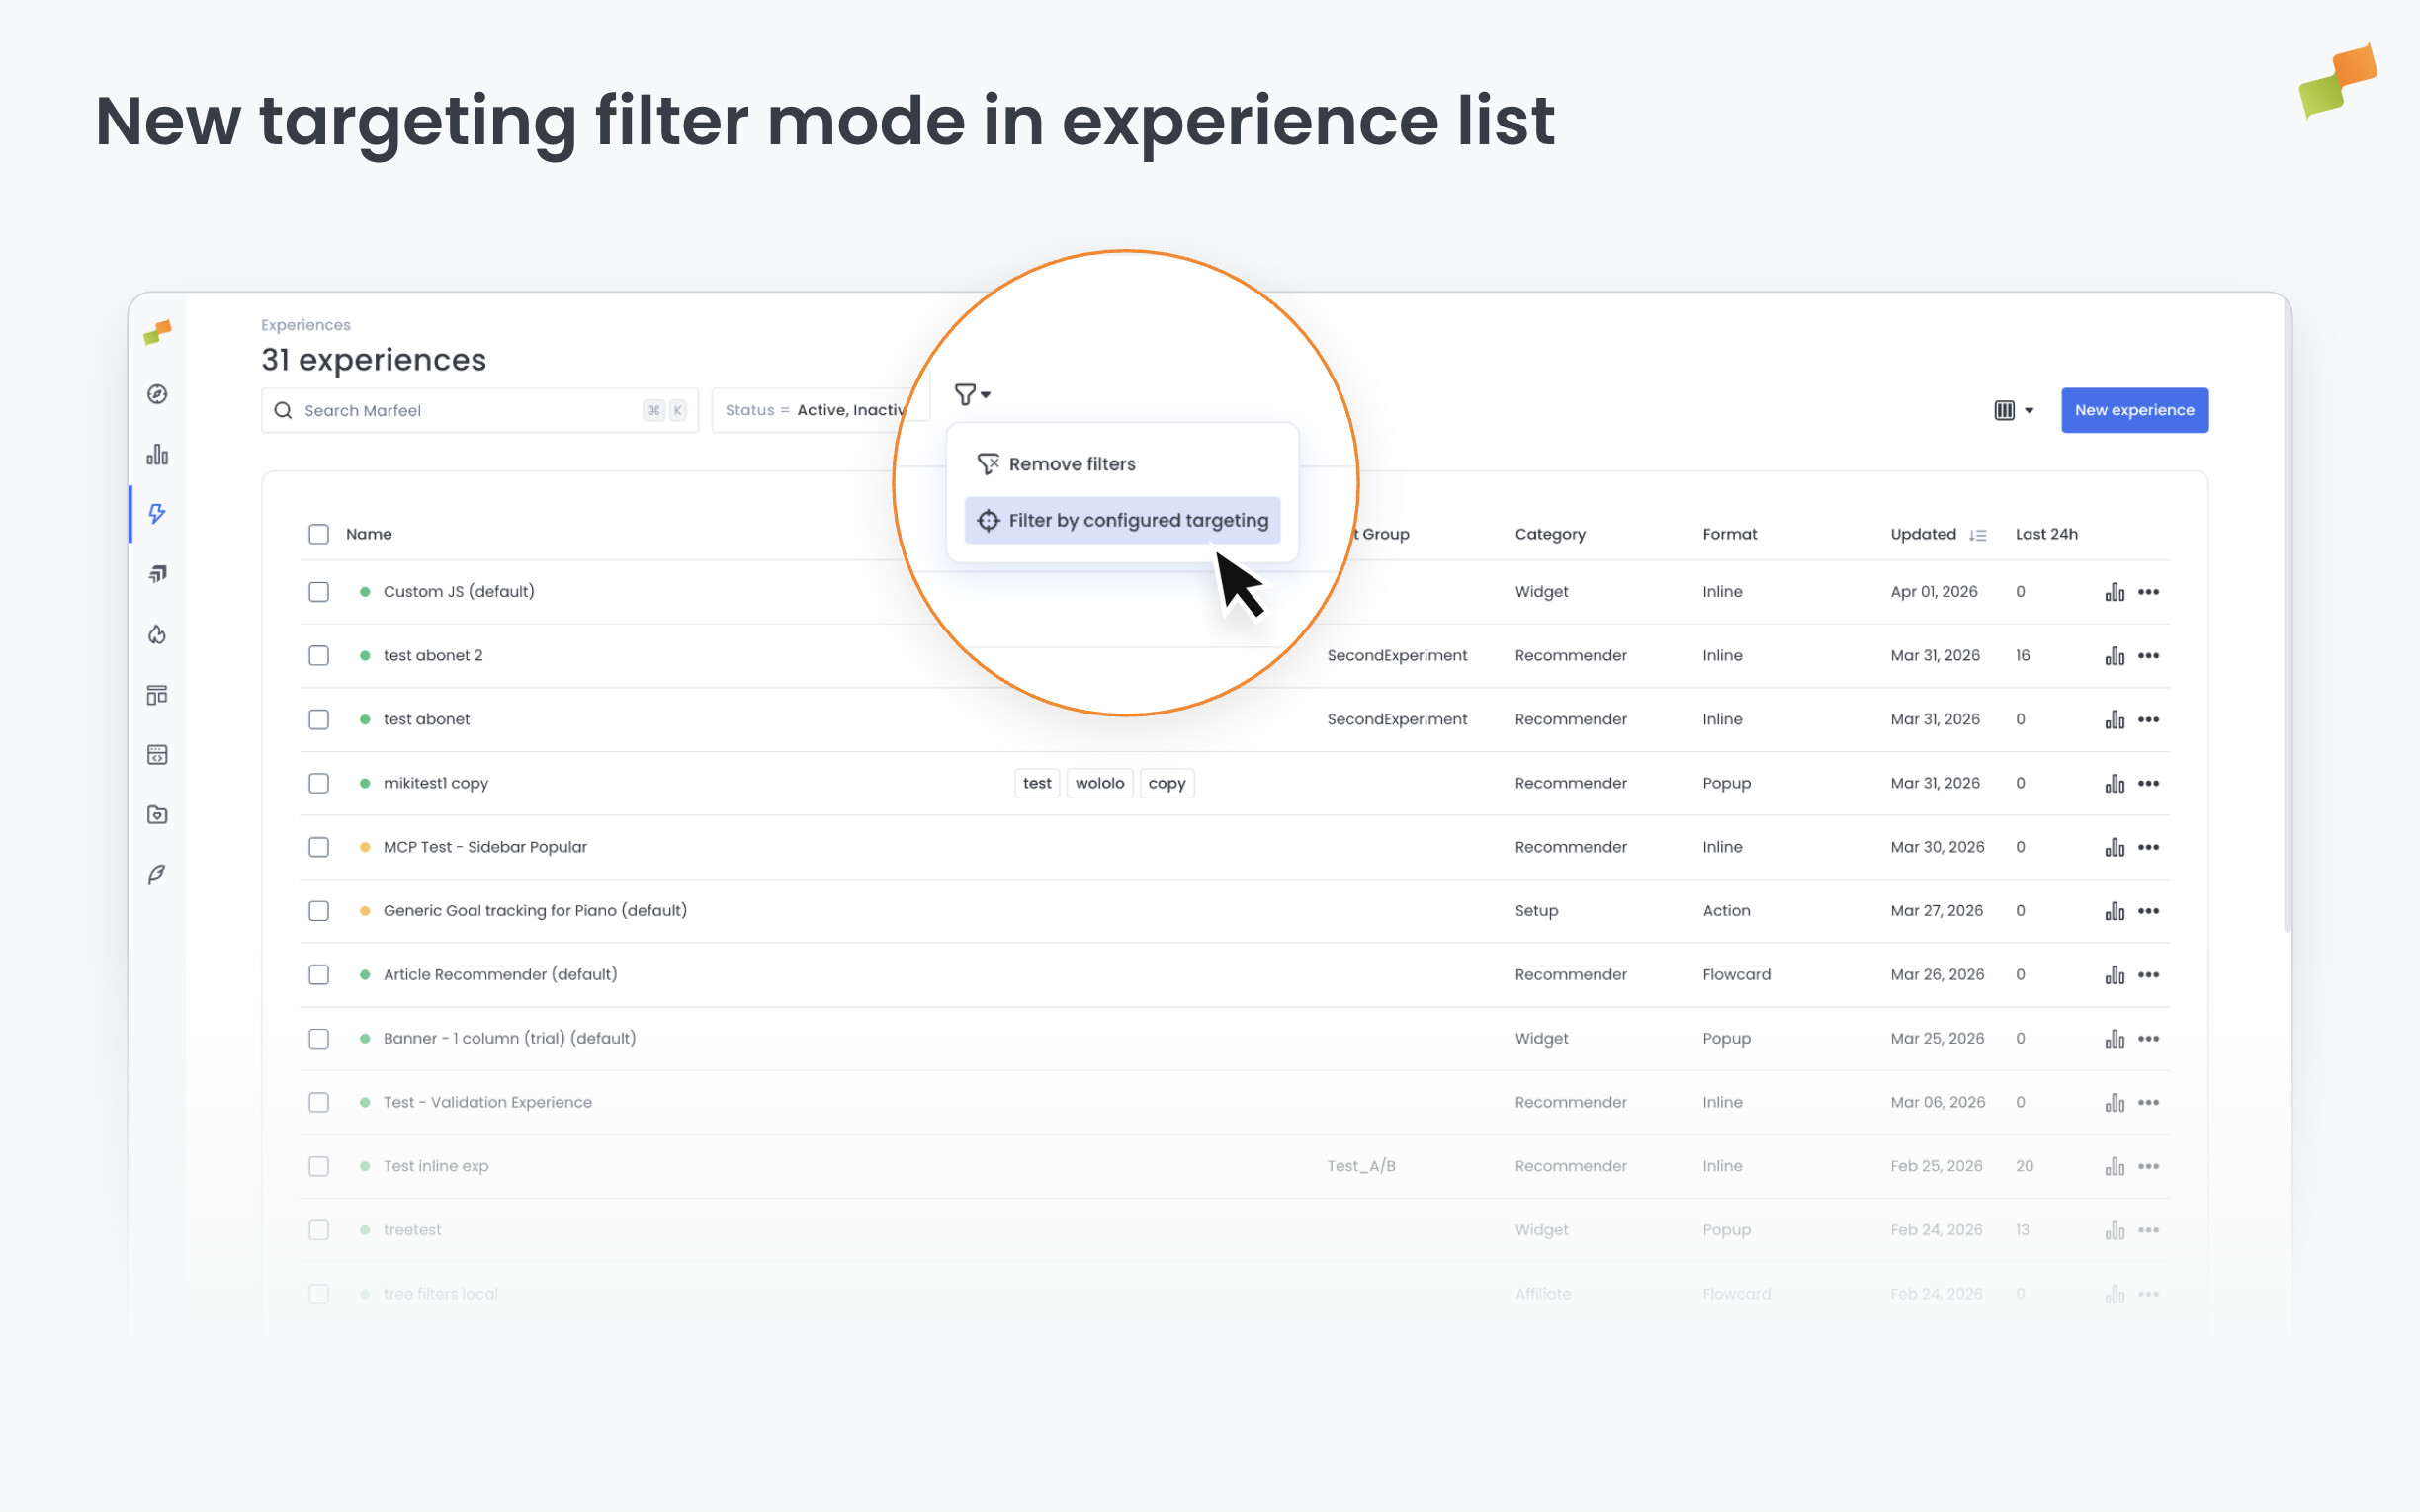
Filter by configured targeting shows experiences based on the targeting rules you have set up, regardless of whether those rules are currently active.
Filter by effective targeting shows experiences based on the targeting that is actually running and delivering to users right now.
The selected mode is saved in the URL, so you can bookmark a specific filtered view or share it with a teammate.
Common tasks
Section titled “Common tasks”Find experiences targeting a specific country
Section titled “Find experiences targeting a specific country”- Type the country name in the OmniSearch bar (e.g., “Colombia”)
- Select Country = Colombia from the suggestions
- Press Enter or click the suggestion
- Experience list shows only experiences targeting users from Colombia
Find all experiences with a specific tag
Section titled “Find all experiences with a specific tag”Option 1, using the tags column:
- Locate an experience with the desired tag in the Tags column
- Click the tag
- List filters to show all experiences with that tag
Option 2, using OmniSearch:
- Type the tag name in the search bar
- System may suggest tag-based filtering
- Select the tag filter
Open a specific experience quickly
Section titled “Open a specific experience quickly”- Type part of the experience name in the search bar
- Matching experiences appear in the dropdown under “Name”
- If only one match, press Enter to open it directly
- If multiple matches, click the desired experience name
View only active experiences
Section titled “View only active experiences”The default view shows Active and Inactive experiences. To see only active:
- Click the Status filter chip above the list
- Deselect “Inactive”
- Only active experiences remain visible
Alternatively, the Status filter can be adjusted through the filter controls.
Customize your view for A/B testing workflow
Section titled “Customize your view for A/B testing workflow”- Click the table settings icon (grid)
- Enable these columns: Name, Test Group, Status, Updated, Last 24h
- Disable columns you don’t need (Format, Layout, Created By)
- Your view now focuses on test-related information
Tip: The Test Group column is clickable. Click any test group name to instantly filter the list and show only experiences belonging to that test group.
Organize with tags
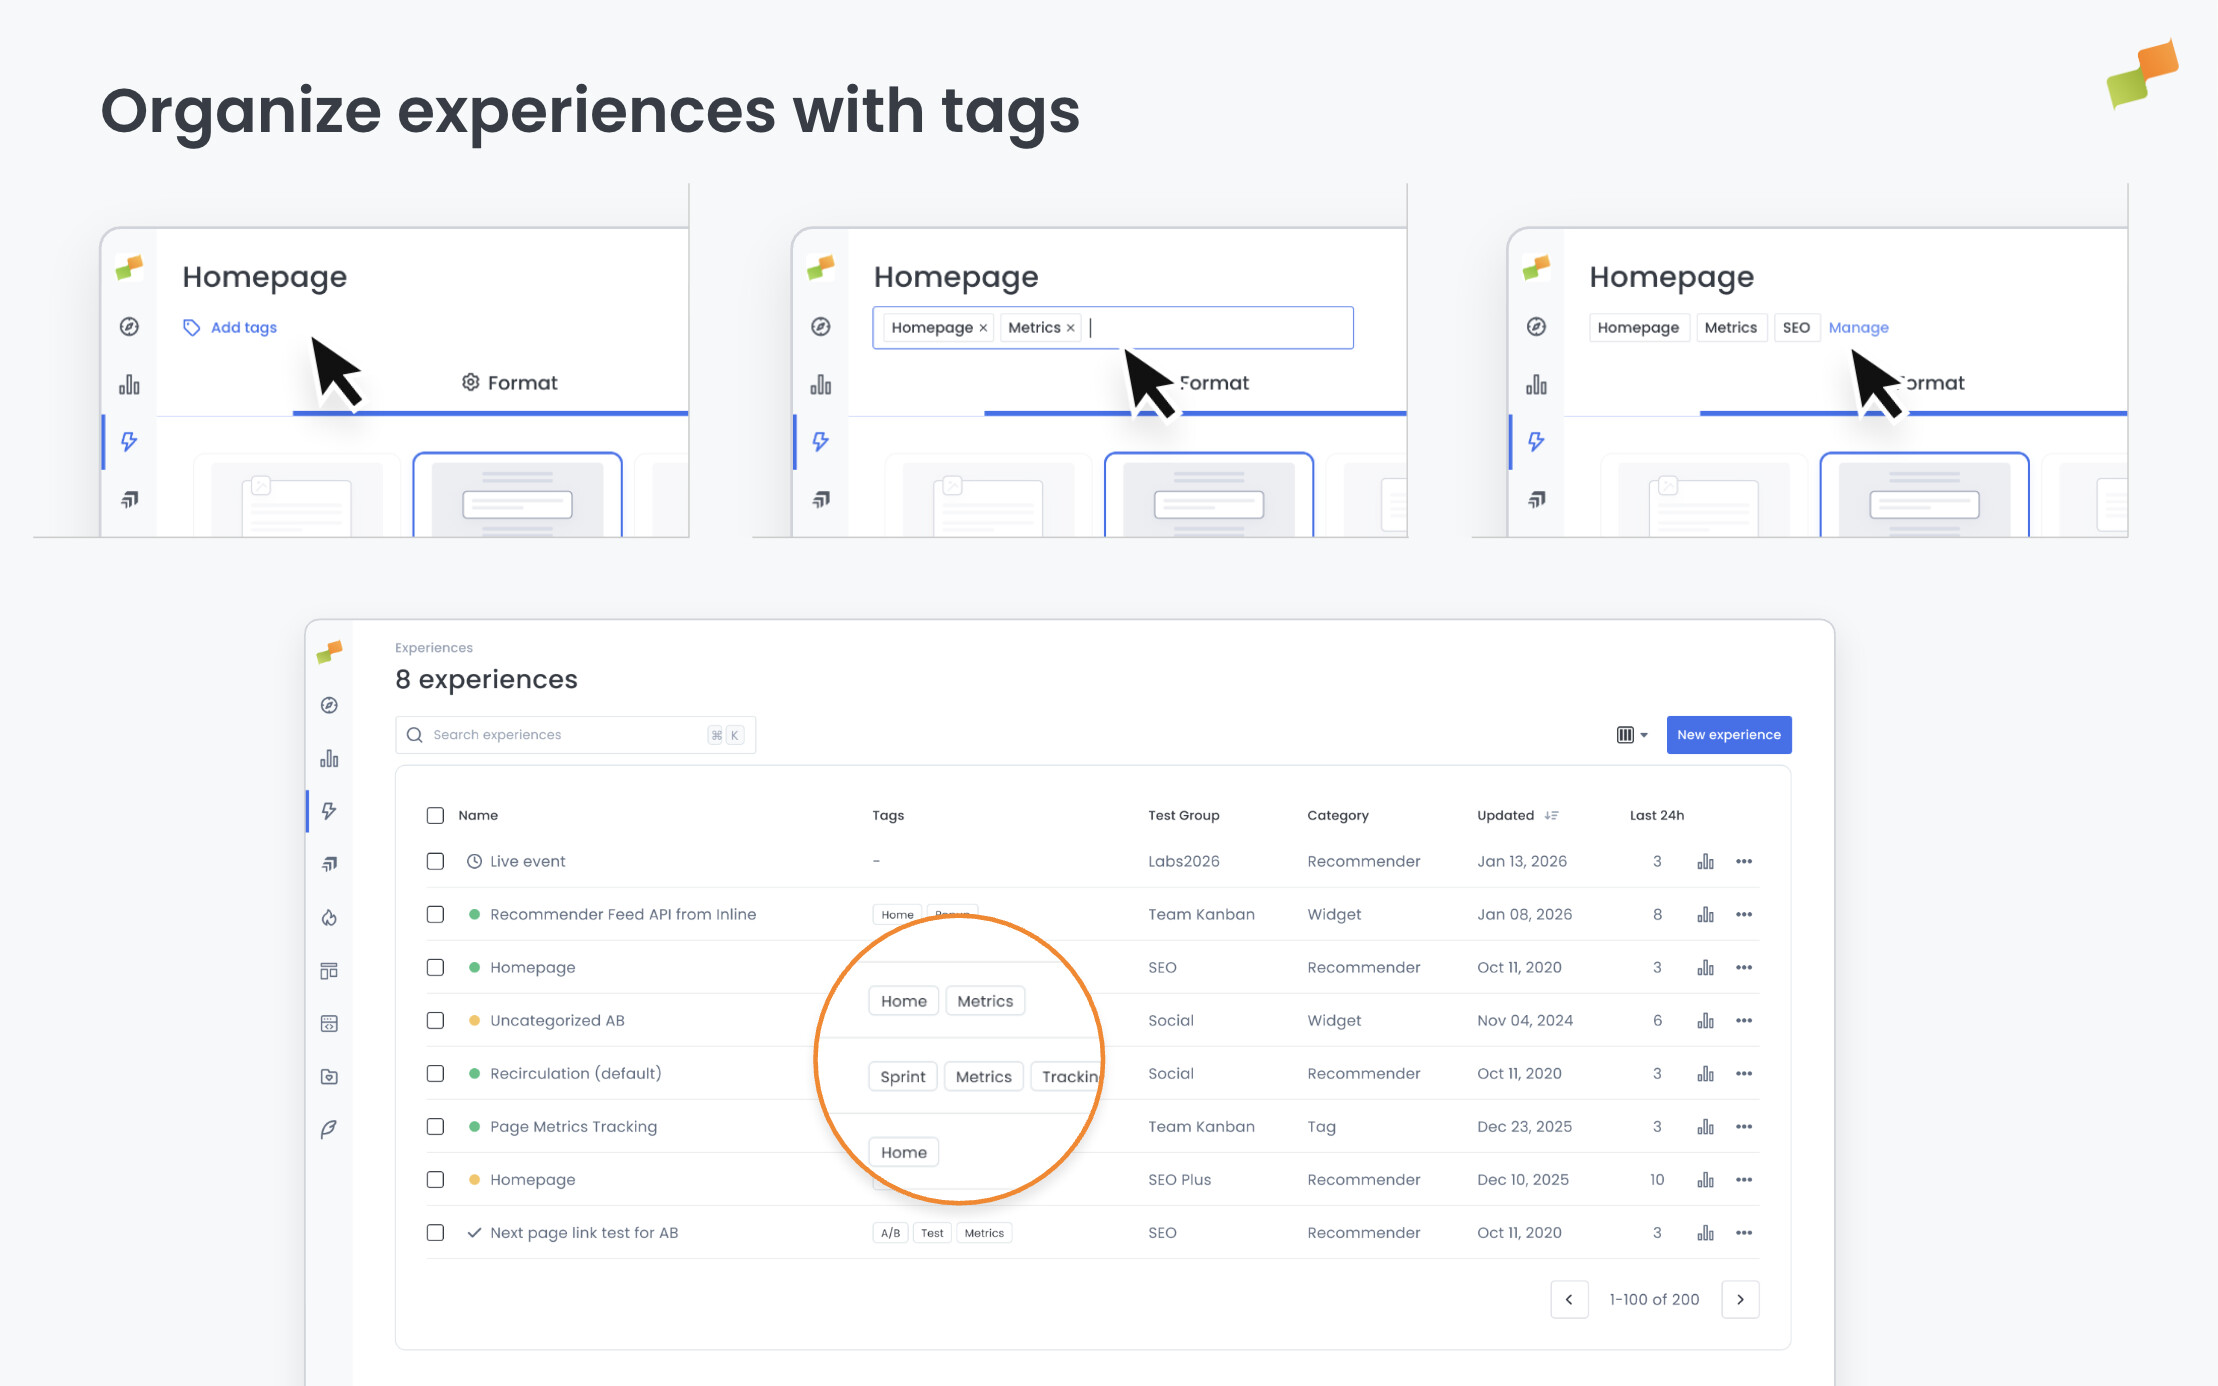
Section titled “Organize with tags”Tags are custom labels you create to group experiences by any criteria that makes sense for your workflow. Unlike fixed categories like Format or Blueprint, tags provide a flexible taxonomy system for organizing and finding experiences.
How to add tags to an experience
Section titled “How to add tags to an experience”Tags can be added from within the Experience Manager editor:
- Open any experience for editing
- Look below the experience title at the top of the editor
- You’ll see a Tags field (a small text input box)
- Click the field and type a tag name
- Press Enter to add the tag
- Repeat to add multiple tags to the same experience
Tags are saved automatically with the experience. There’s no predefined list of tags: you create them as needed by typing new tag names.
When to use tags
Section titled “When to use tags”Tags work as conceptual groupings that help you organize experiences beyond their technical attributes:
Campaign-based organization:
- Tag all experiences for a holiday campaign with “black-friday-2026”
- Tag subscription drives with “sub-campaign-q1”
- Tag seasonal content with “summer-2026”
Team-based organization:
- Tag experiences by team: “editorial-team”, “growth-team”, “product-team”
- Tag by owner: “managed-by-john”, “marketing-dept”
Testing and experimentation:
- Tag all tests related to a hypothesis: “test-scroll-depth”, “test-cta-colors”
- Tag experiments by stage: “testing”, “proven-winner”, “deprecated”
Content strategy:
- Tag by audience: “new-readers”, “loyal-subscribers”, “mobile-users”
- Tag by content type: “news-widgets”, “sports-content”, “local-news”
Geographic campaigns:
- Tag regional campaigns: “latam-campaign”, “europe-only”, “us-domestic”
Finding experiences by tags
Section titled “Finding experiences by tags”Once tagged, experiences become easier to find using two methods:
Click tags in the list: When the Tags column is visible in the experience list, any tag is clickable. Click a tag to instantly filter the list to show only experiences with that tag. See Clickable tags for quick filtering above.
Search by tag: Use OmniSearch to find tagged experiences. Type the tag name in the search bar, and the system will show all experiences with that tag.
Tagging strategy: Establish tag naming conventions with your team to avoid duplicates like “test” vs “testing” vs “tests”. Consistent tag names make filtering more effective.
Clone experiences
Section titled “Clone experiences”Cloning creates an exact copy of an existing experience with all configuration intact. Clones are created as Inactive (Draft) with “(copy)” appended to the name.
Three ways to clone
Section titled “Three ways to clone”From the experience list (single): Click the three-dot menu (⋯) next to any experience name, then select Clone. The editor opens with all settings from the original.
From the experience list (bulk): Select multiple experiences with checkboxes, click the Actions menu, then select Clone. Multiple clones are created immediately.
From within the editor: Click the dropdown action button (next to Save & Publish), then select Clone. The editor reloads with a cloned version.
What gets cloned
Section titled “What gets cloned”When you clone an experience, the following are copied:
- Format configuration: All Format tab settings (triggers, snap points, placement, etc.)
- Content configuration: All Content tab settings (layouts, recommender settings, styles, etc.)
- Targeting rules: All Targeting tab filters and dimensions
- Delivery settings: Priority, frequency capping, scheduling (except start/end dates are reset)
- A/B test configuration: Test group assignments and variant settings
- Tags: All tags from the original experience
What is NOT cloned:
- Status: Clones are created as Inactive (Draft state) regardless of original status
- Scheduling dates: Start and end dates are cleared
- Performance data: Metrics and stats from the original don’t carry over
Version control tip: Before making significant changes to a working experience, clone it first. This creates a backup you can reference or restore if needed.
Going deeper
Section titled “Going deeper”- Experience Manager Overview: The four-tab editor walkthrough.
- Delivery & Scheduling
- Triggers
- Targeting
- A/B Testing
- Blueprints
- Inline: DOM injection, CSS selector placement, and visual element selector.
- Popups: Modal vs contextual modes, position, triggers, and orchestration.
- Flowcards: Isolated AMP rendering, snap points, card icons, and browser history integration.
- Tag Experiences: SDK configuration for tracking, integrations, and third-party tools.
- Recommender: Configure recommendation engines and layouts.
- Page Transformations
- Testing and Troubleshooting: Preview, live test, and debug your experiences.
- Web Activation: How the SDK delivers experiences on your site.
- AMP Activation: Run Flowcards on AMP pages.
What happens to inactive experiences after 14 days?
Inactive experiences are automatically archived after 14 days. This keeps the experience list focused on active campaigns. Archived experiences remain accessible through the status filter.
What does OmniSearch detect when filtering experiences?
OmniSearch automatically detects what you are searching for, including experience names, tags, test groups, blueprint categories, formats, layouts, countries, priority values, and status. Type any term and the system suggests matching filters.
What is included when cloning an experience?
Cloning copies format configuration, content configuration, targeting rules, delivery settings, A/B test configuration, and tags. Status resets to Inactive (Draft), scheduling dates are cleared, and performance data does not carry over.