
Amplify articles for social media distribution
Marfeel Amplify lets you publish articles across social media channels from a single composer, automating image generation, copy creation, and multi-channel scheduling. You can create posts from existing articles or build them from scratch.
Amplifying an article
Section titled “Amplifying an article”There are two ways to create a post: from an article or from scratch.
From an article
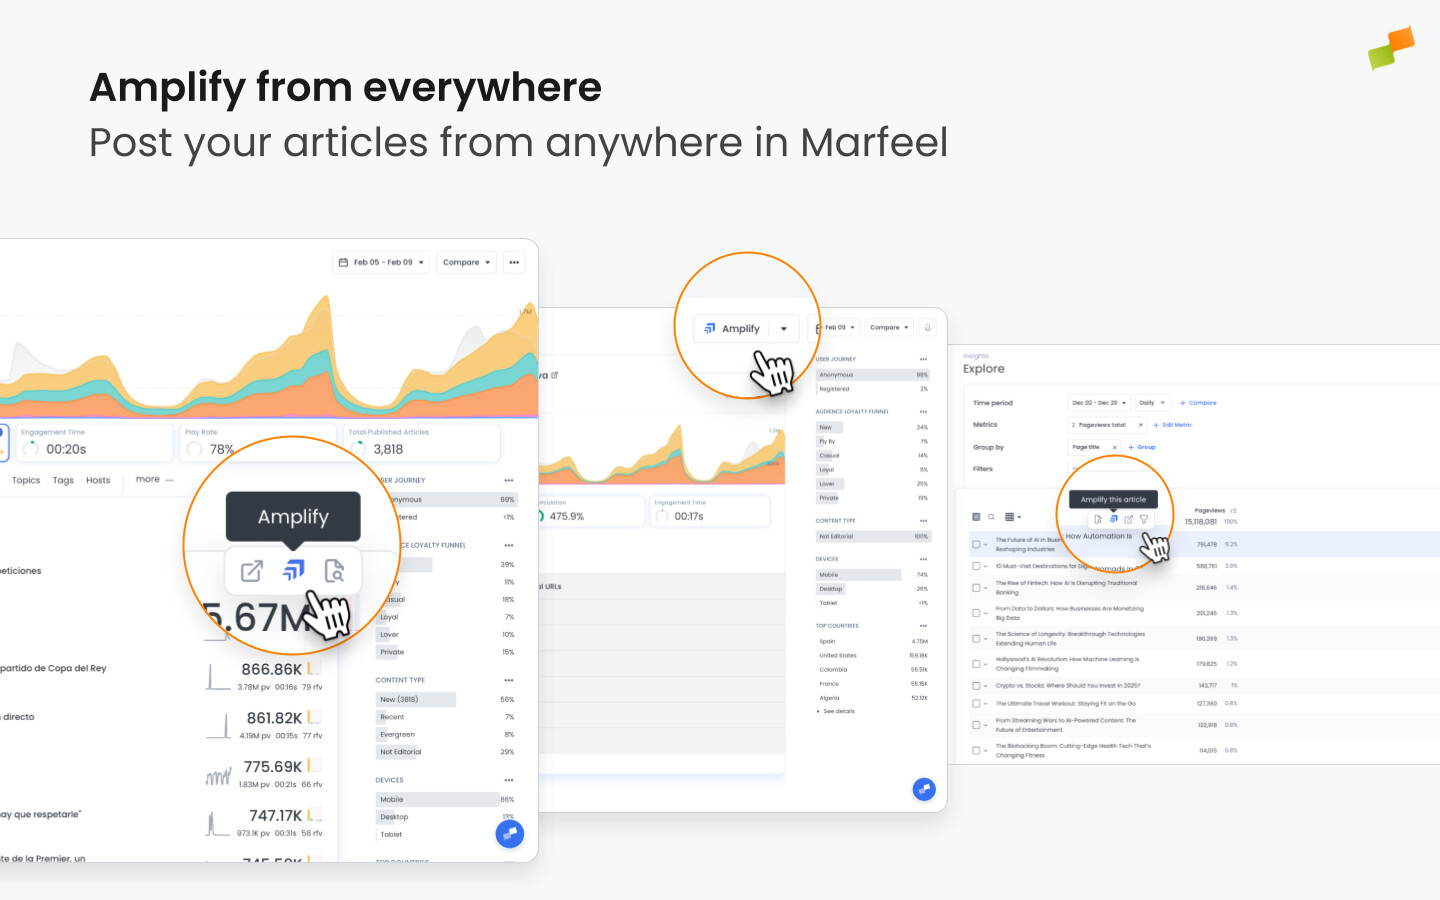
Section titled “From an article”Select the article you want to share from anywhere in Marfeel where article entries appear: the main Compass view, Amplify feeds, reports in Explore, and other places.
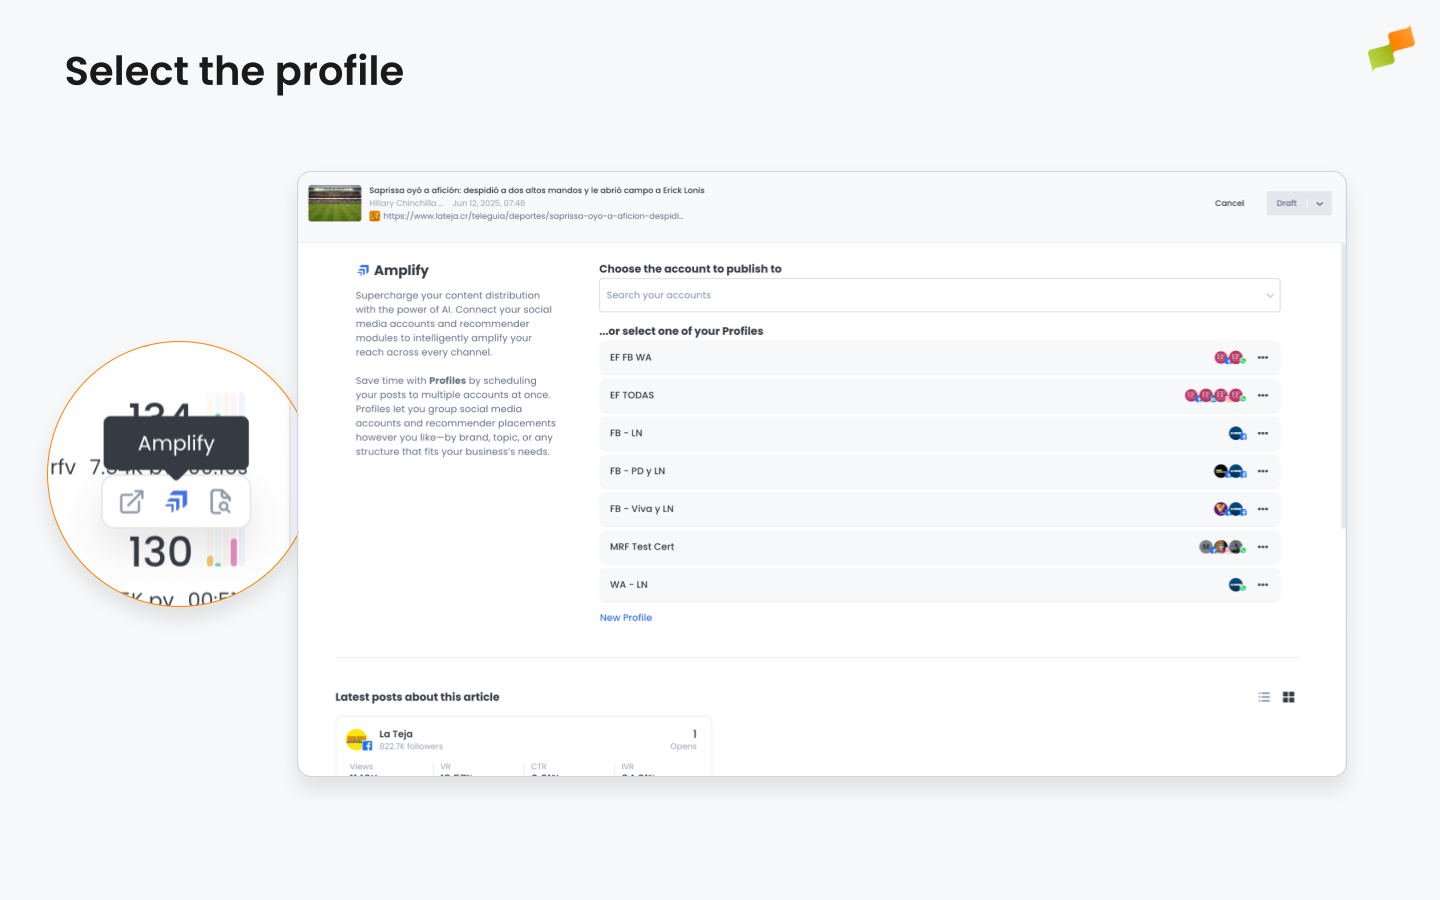
To open Amplify, hover over an article entry and click the Amplify icon, or use the dedicated button in the article details page.
When the article has already been published through Amplify, or has existing saved drafts, a screen shows the performance of published posts and available drafts you can continue working on. You can also start a new campaign by clicking Create New Campaign at the top.
From scratch
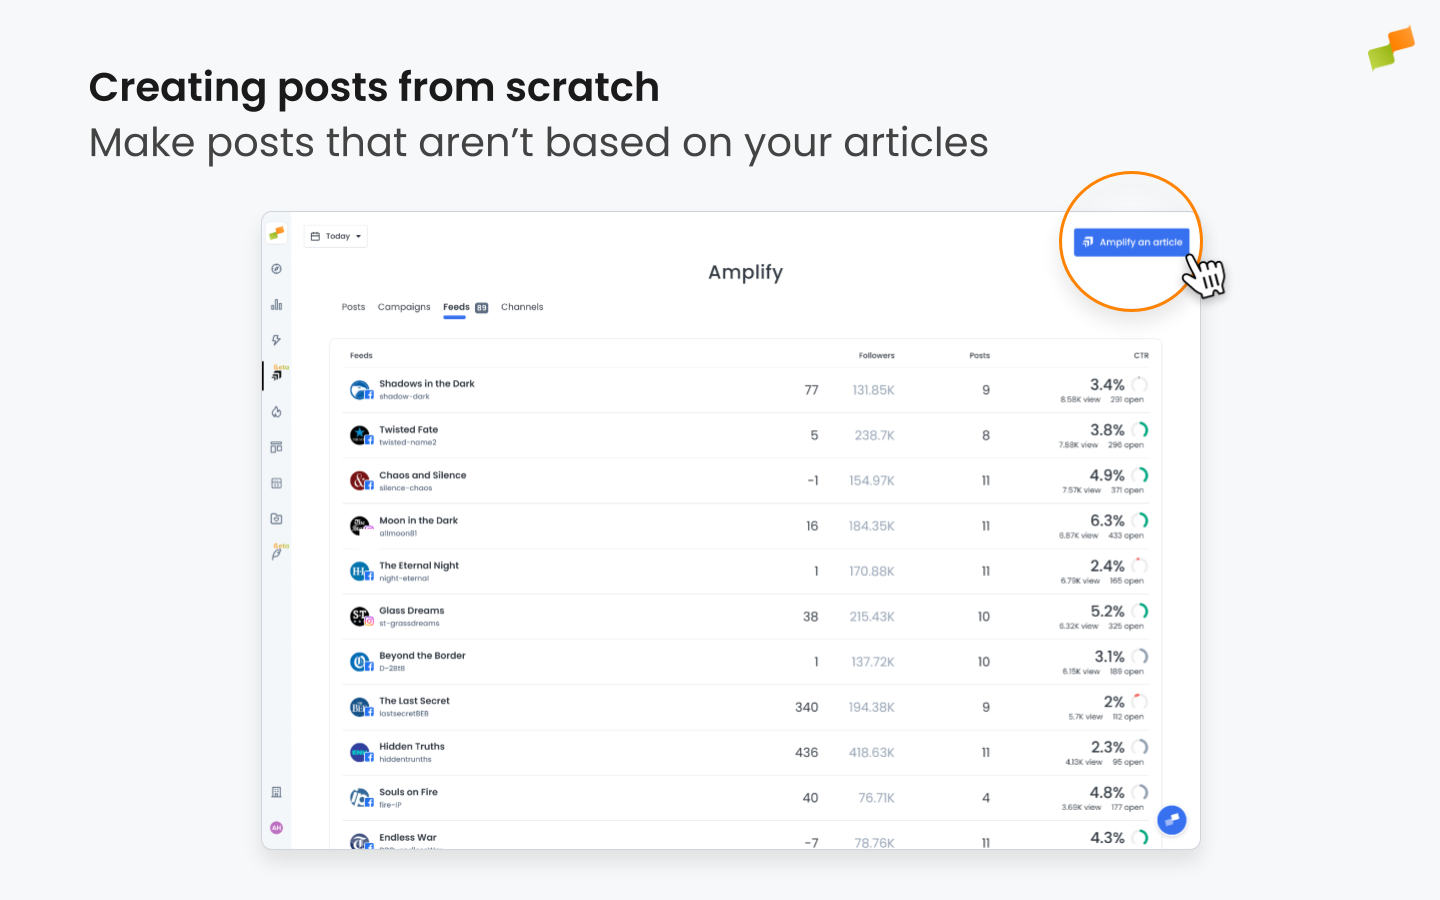
Section titled “From scratch”You may want to create a post that is not based on one of your articles. This is useful for non-article content, custom messages, offers, shared images, or direct messages from your editor.
To create a post from scratch, go to one of Marfeel Amplify’s main screens: Posts, Campaigns, Feeds, or Channels and click the New Campaign button in the top right. This opens a blank Amplify panel where you can add text and images as you see fit.
🎓 Become a Marfeel Amplify expert 📣 Learn how to publish smarter, automate sharing, and optimize your social strategy with our Marfeel Amplify Course.
✅ Workflow-focused training ✅ Automation strategies ✅ Certificate of completion included
🧠 Start now on Marfeel Academy.
Selecting a post type
Section titled “Selecting a post type”The post type you choose affects audience engagement and should align with both your content goals and platform strengths. Options vary by channel and can be selected in the right-hand panel.
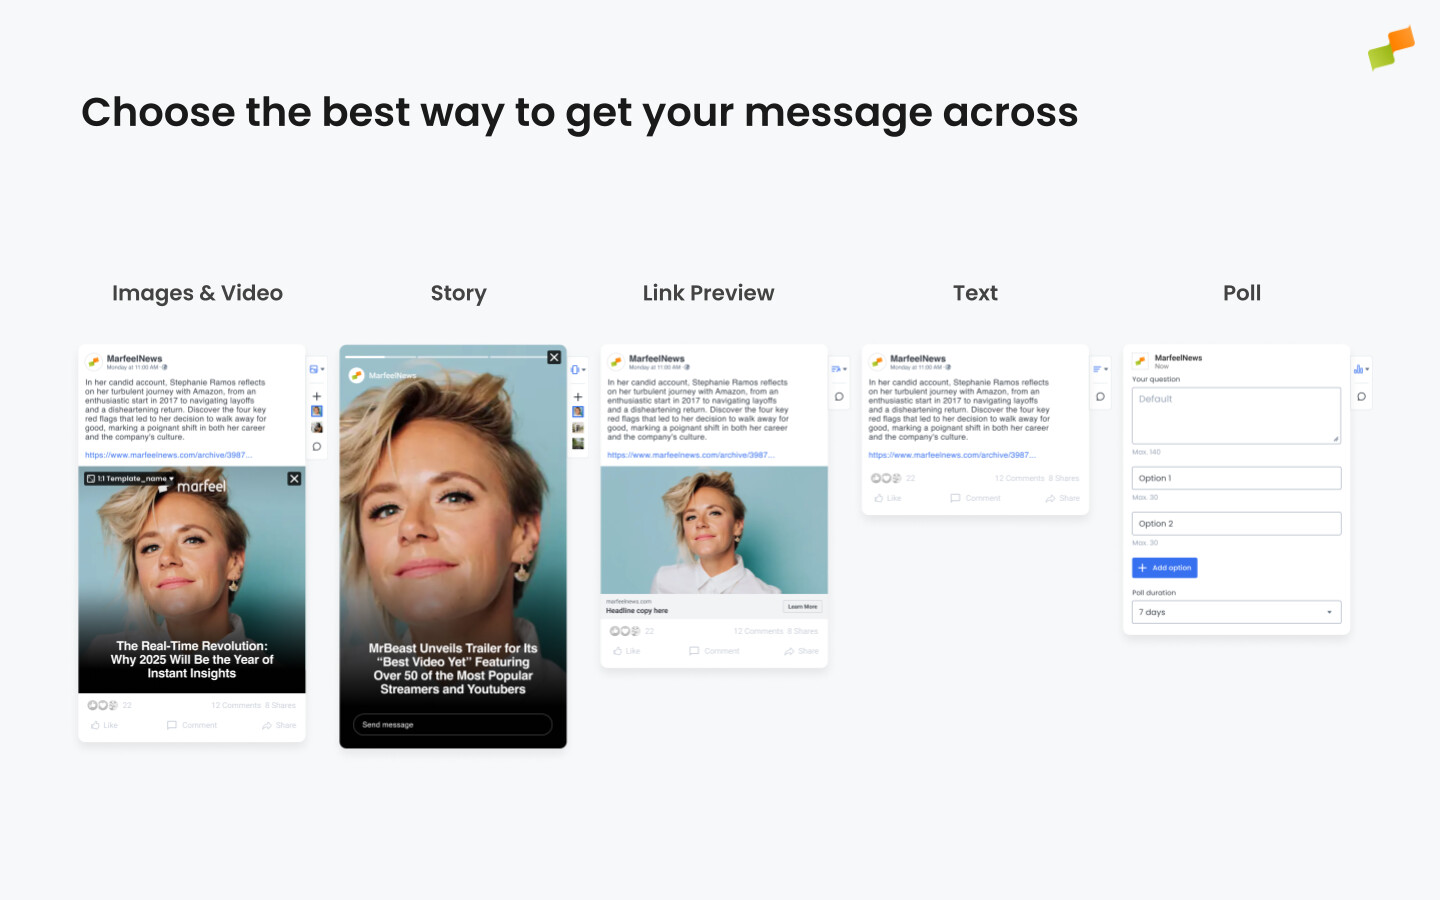
- Images/Video: Single visuals maximize impact, while carousels suit multi-image stories like photo essays.
- Stories: Ideal for time-sensitive content like breaking news or live events.
- Link Previews: Auto-generated from Open Graph tags but often underperform compared to custom visuals.
- Text: Clean formatting with links (in-post or in comments) may bypass platform reach limits.
- Polls: Boost interaction for opinion pieces or audience sentiment checks.
For details, see the full guide on Post Types.
Preparing the images
Section titled “Preparing the images”Amplify pulls all images from your article, lets you choose which ones to use, and styles them with your layouts. You can also upload images that are not part of your article.
WebP images are converted automatically when sharing to WhatsApp, LinkedIn, YouTube, or Instagram (including YouTube thumbnails), so no manual conversion is required.
Layouts and aspect ratios
Section titled “Layouts and aspect ratios”Social media images take on different formats and sizes depending on the platform, the type of post, and the preferences of the publisher. In Amplify, these are represented as aspect ratios you can choose when configuring your images.
The available aspect ratios are:
- 9:16 (Story): Used to generate Story-type posts on Instagram, Facebook, TikTok, and LinkedIn.
- 1:1 (Square): Works on all social media platforms. Takes up less of the viewport.
- 4:5 (Portrait): Works on all social media platforms. The most common format on mobile devices when not creating a Story.
- 16:9 (Landscape): Works on all social media platforms. Best for posts where the image is wide and horizontal.
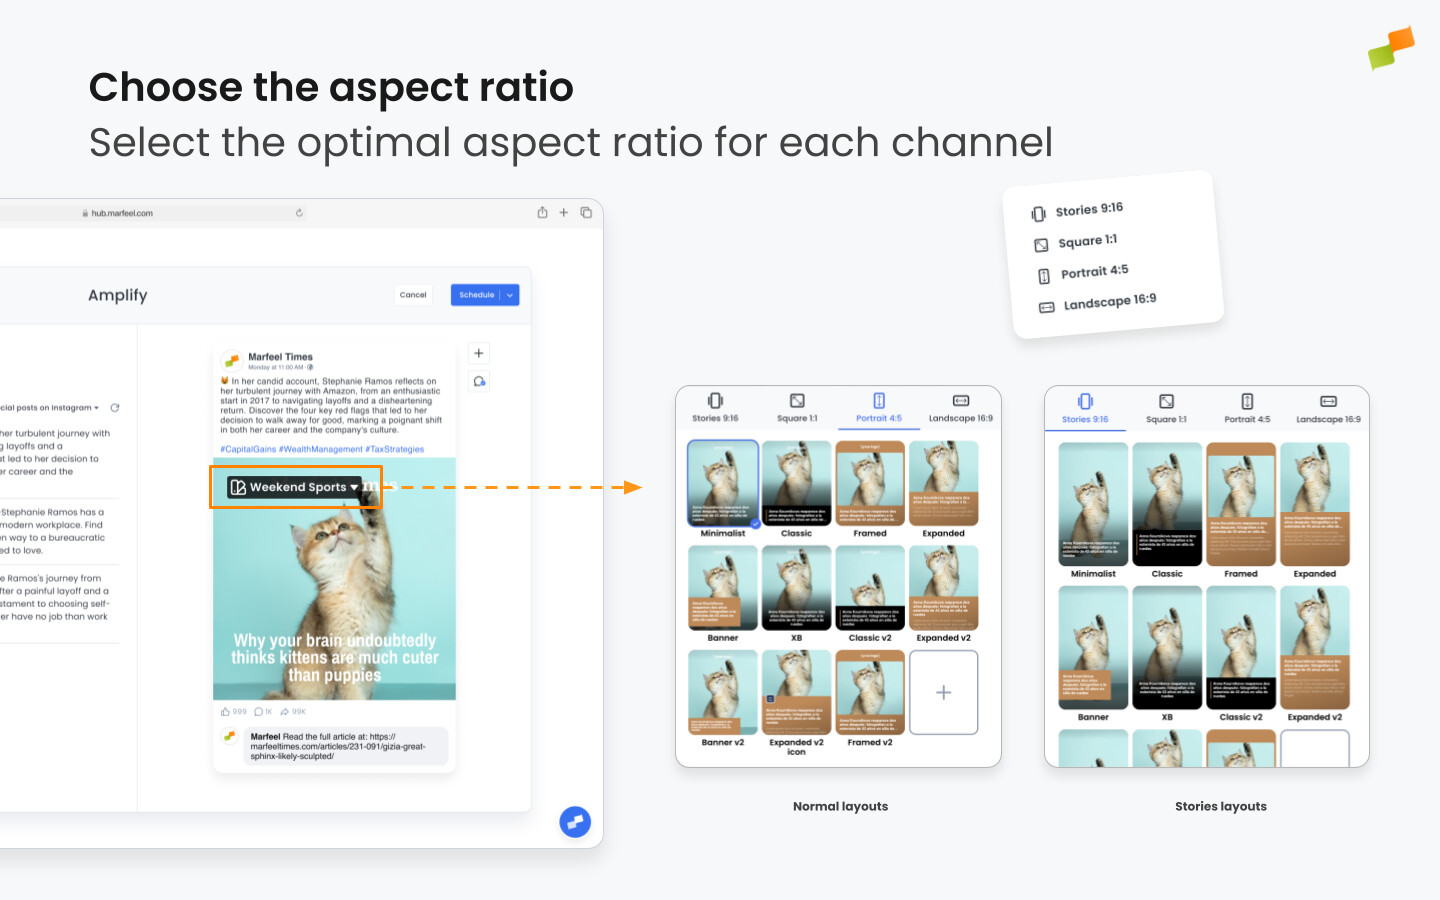
Select the layout you will use to style your images from among those available in your account. Visit our detailed article to learn more about how layouts are created and customized.
If you are posting on more than one channel or feed, you can select different layouts and aspect ratios for each post.
The aspect ratio you choose tells Amplify and the social platform what type of post you are creating. For example, selecting 9:16 on Instagram or Facebook creates a Story and publishes it as such. Aspect ratios are prescriptive.
Inline editing
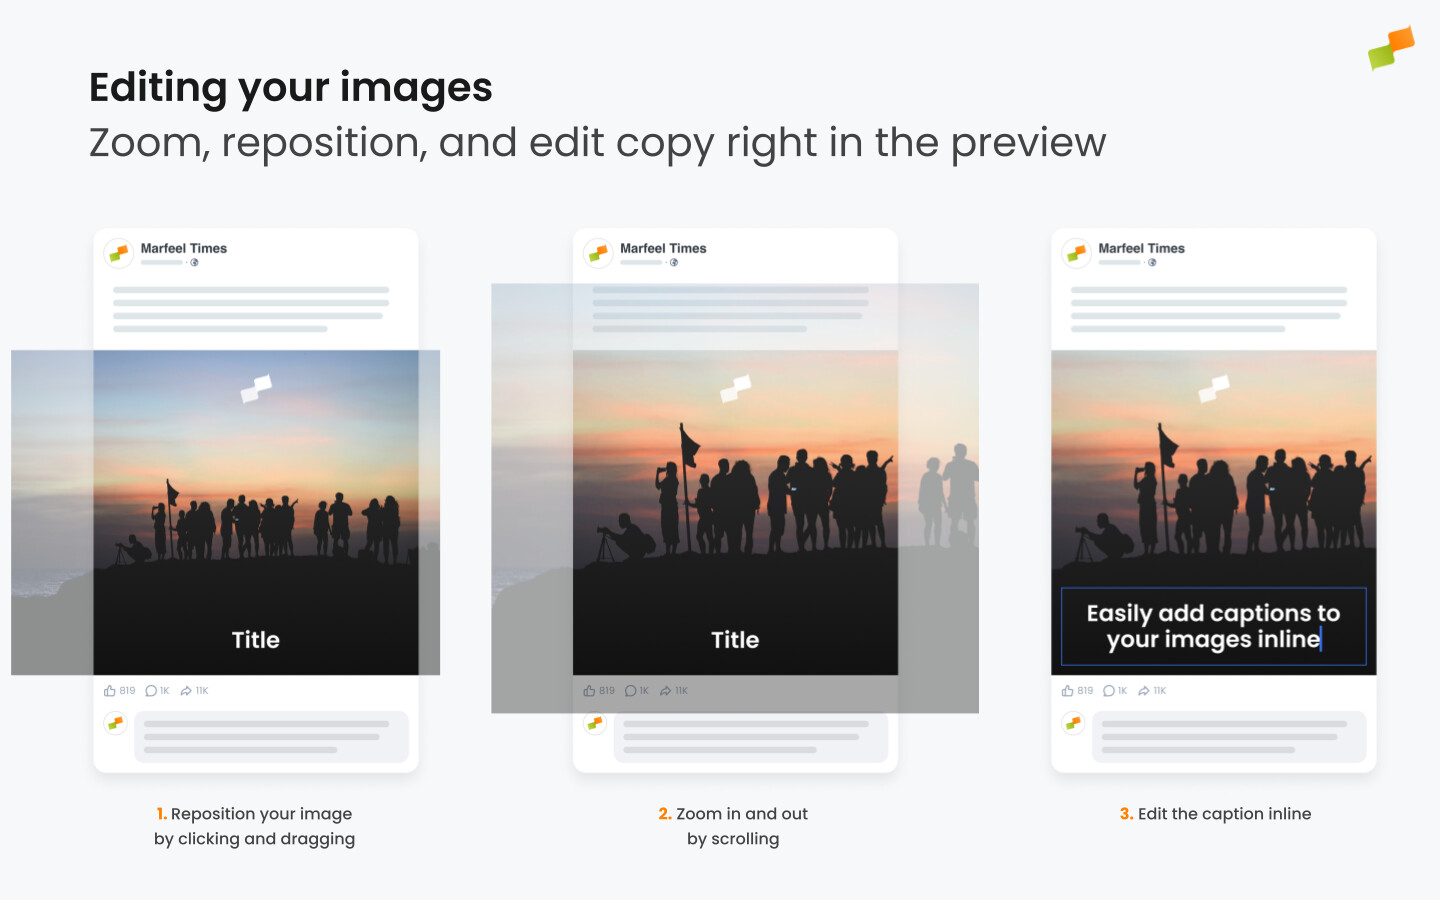
Section titled “Inline editing”Click on any text overlaid on your image to edit it directly in the preview. The contents update and save as you work. Zoom in, zoom out, and reposition your image using the scroll function, then click and drag to recenter and reframe it.
Creating carousels
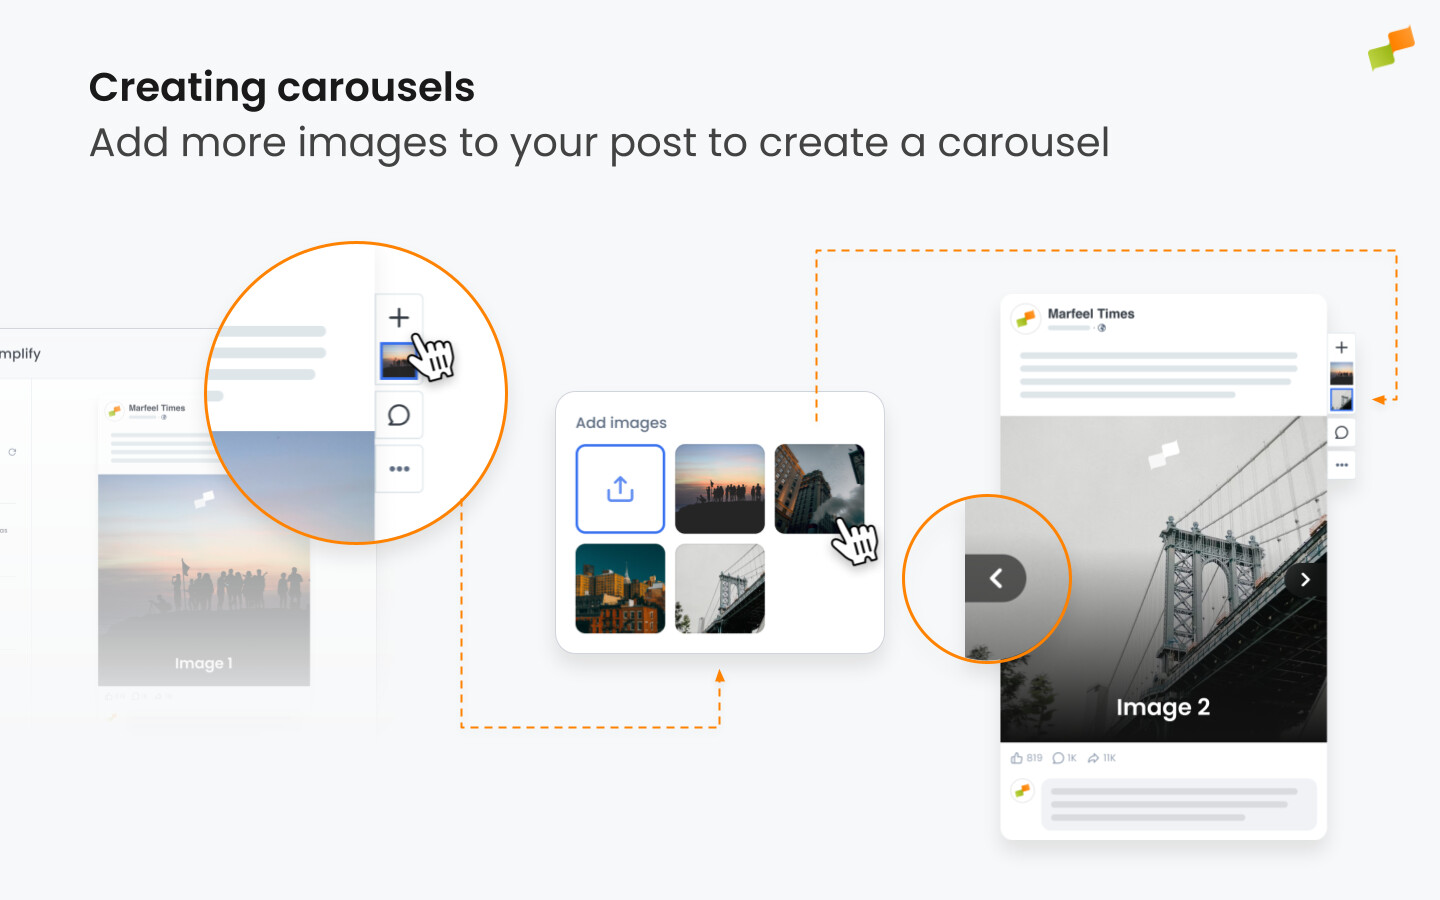
Section titled “Creating carousels”Add more than one image to a post to create a carousel. Click the image management + symbol to the right of the preview and select additional images. Amplify automatically pulls all images from the article, but you can upload other images too. Depending on the destination social network, Amplify generates optimized formats:
- Facebook and Instagram native carousels
- A PDF viewer for LinkedIn
Styling options
Section titled “Styling options”Social media posts contain multiple brand-identifying elements: your logo, your choice of font, your accent color, your background color, your avatar, and more.
These elements can be defined at the global, account, and layout level.
If you need more customization, you can create custom branded layouts using HTML & CSS.
Advanced text styling
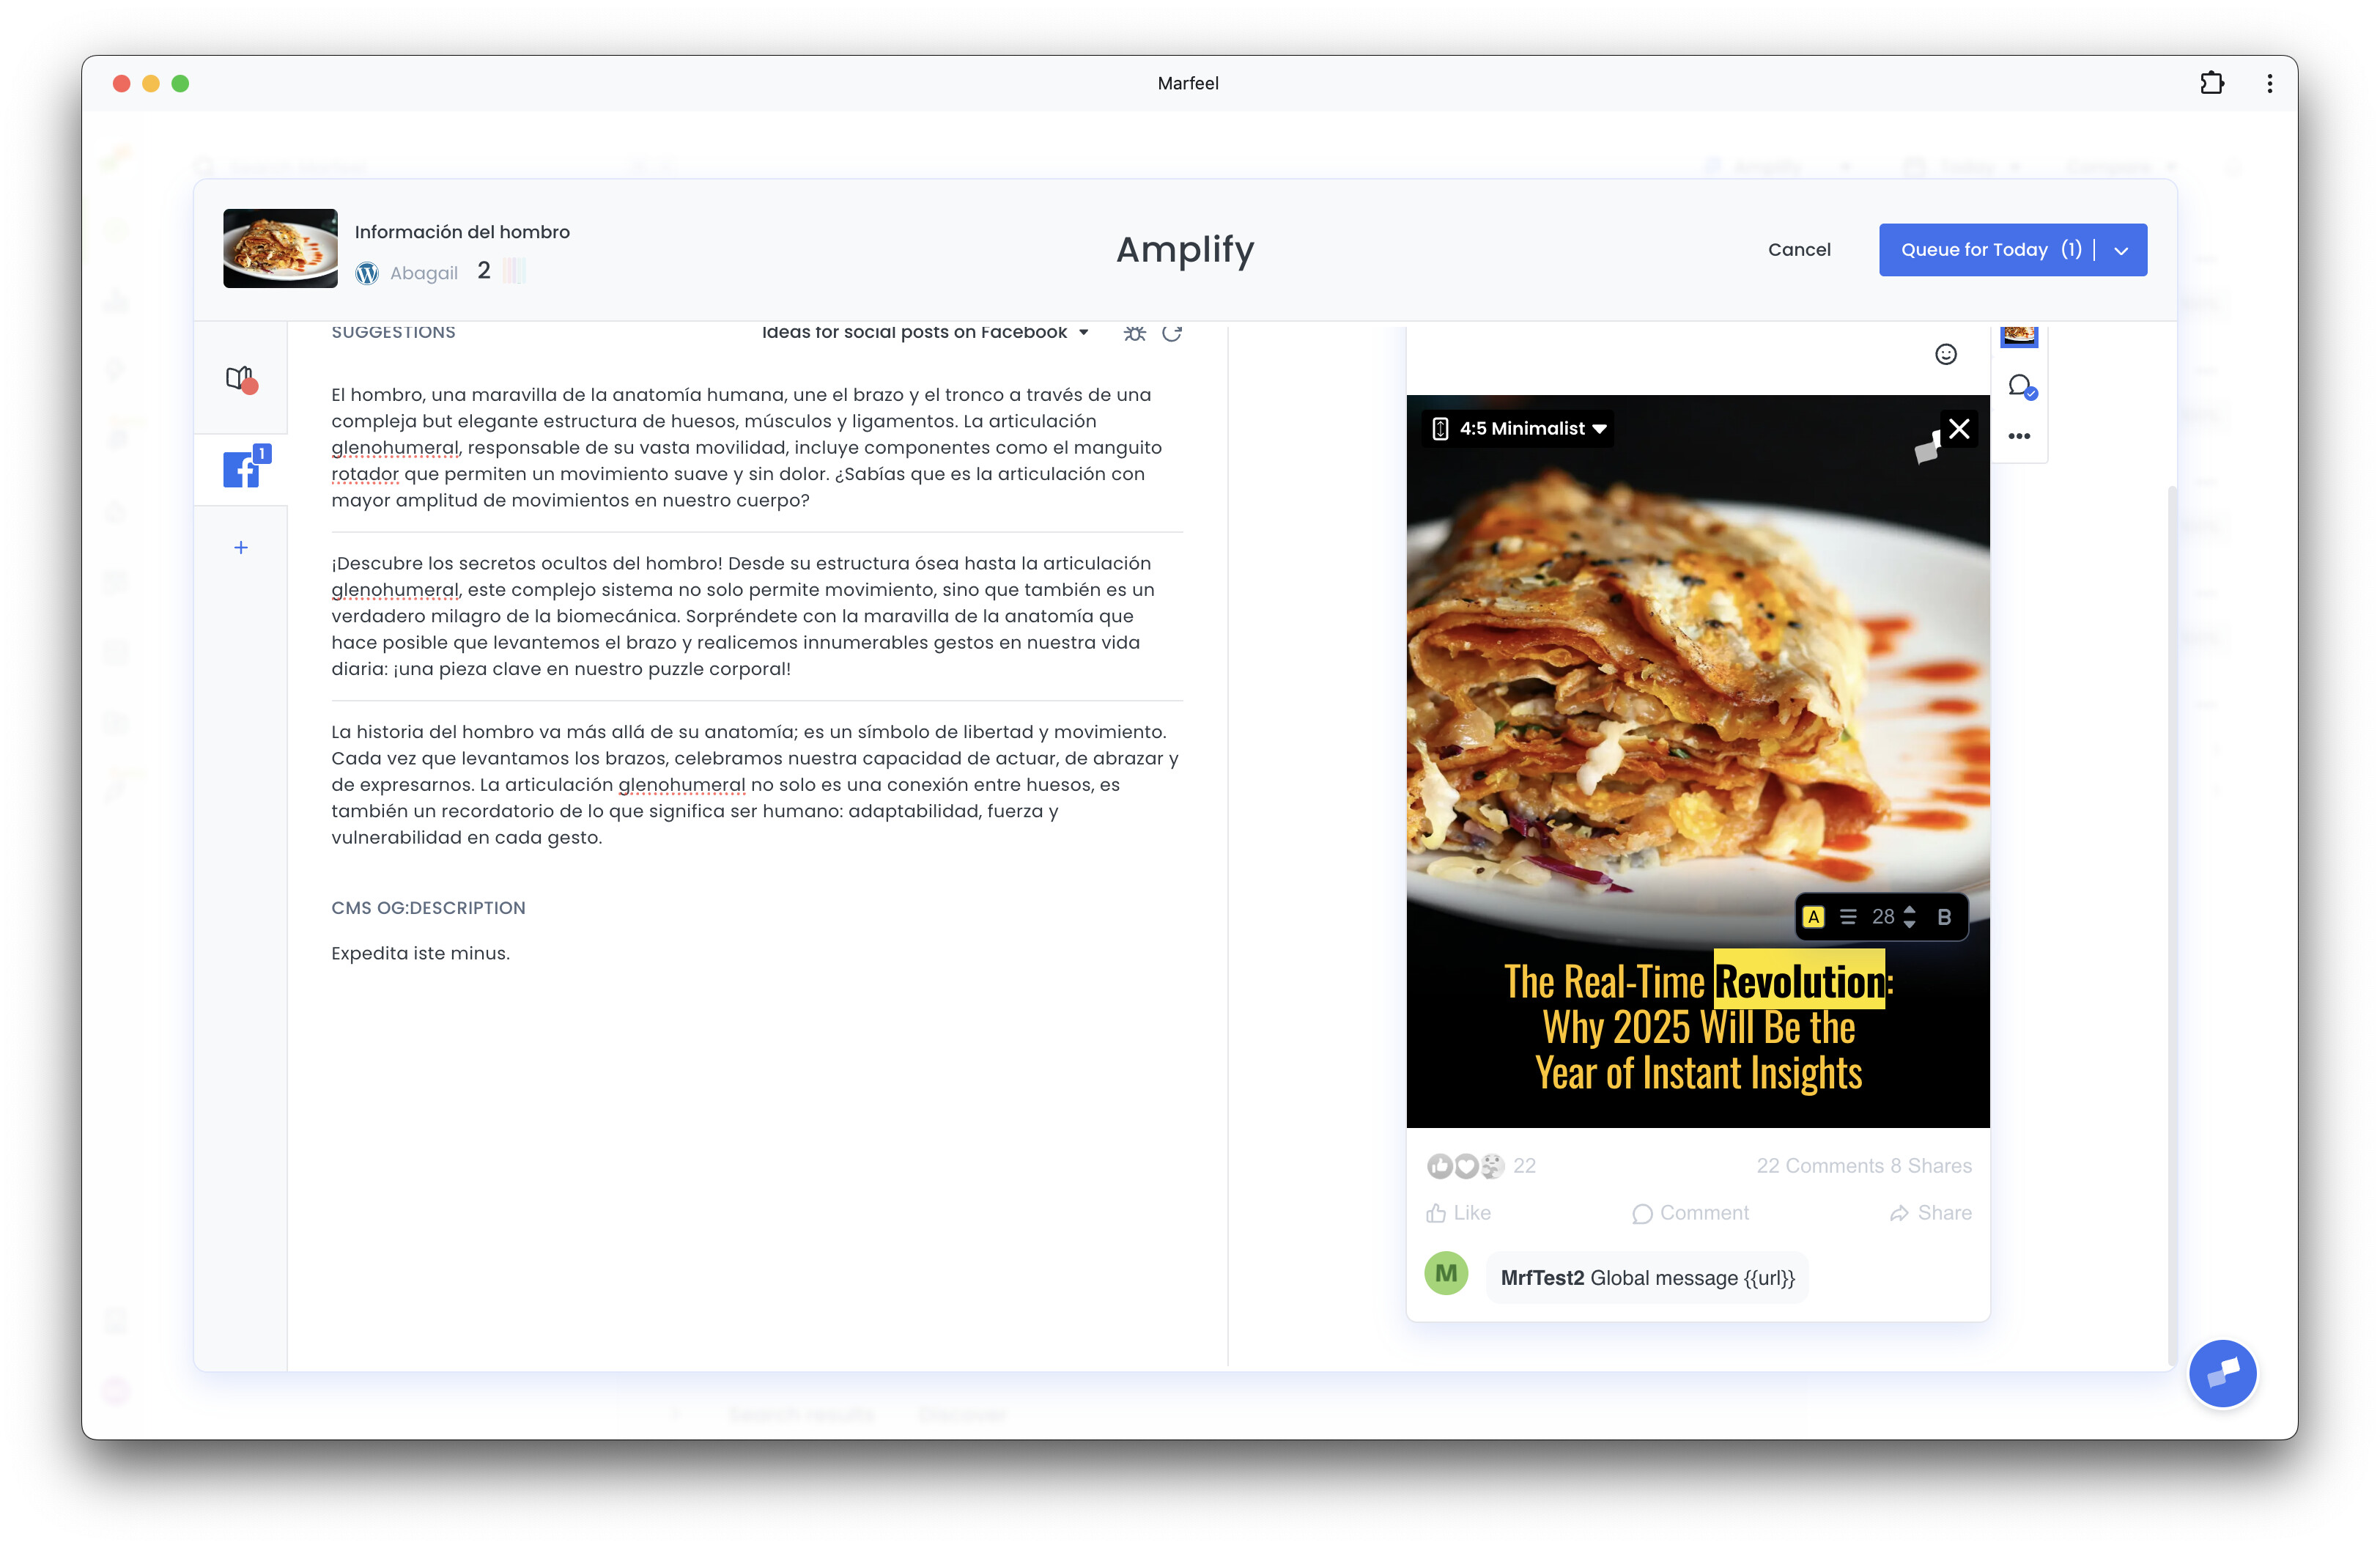
Section titled “Advanced text styling”Amplify includes a text highlighter that lets you apply custom styling to specific parts of your text directly within titles and headlines.
With the highlighter, you can:
- Change the text color of individual words or phrases
- Apply a background color behind selected text
- Combine both to emphasize key parts of your message or match your brand’s visual identity
This opens creative possibilities for drawing attention to specific terms, highlighting calls to action, or visually separating different parts of a title without editing the layout itself.
Highlighting is applied inline, so you can style only the words that need it while keeping the rest of the title untouched. This ensures a consistent, professional look with full control over emphasis and visual hierarchy.
Supported media formats and transcoding
Section titled “Supported media formats and transcoding”Amplify accepts a wide range of video, audio, and image formats and transcodes each file to meet the requirements of every destination network.
| Type | Formats |
|---|---|
| Video | MP4, MOV, WebM, MKV, WMV, AVI, MPG, MPEG, M4V, OGV, 3GP, 3G2, FLV |
| Audio | MP3, OGG, M4A, WAV |
| Image | JPG, JPEG, PNG, WebP, AVIF, TIFF |
Transcoding runs in the background. The post shows a live status until the media is ready, and you can publish or schedule the post immediately — Amplify holds it in the queue and publishes as soon as the file is ready. If transcoding fails for a given network, the post log shows the reason and you can replace the media without recreating the post.
🎓 Master Amplify, step by step 📊 The video below is an excerpt from the Amplify Fundamentals course.
🧠 Discover more learning paths on Marfeel Academy.
Writing your post
Section titled “Writing your post”After selecting an article, Amplify presents multiple options for the copy of your post:
-
A default option, retrieved from the article’s
og:titleandog:descriptionfields. This populates the copy and image text in the post preview. -
Three automatically generated post variants, created by Marfeel Copilot based on the content of your article and analysis of your most successful social media posts.
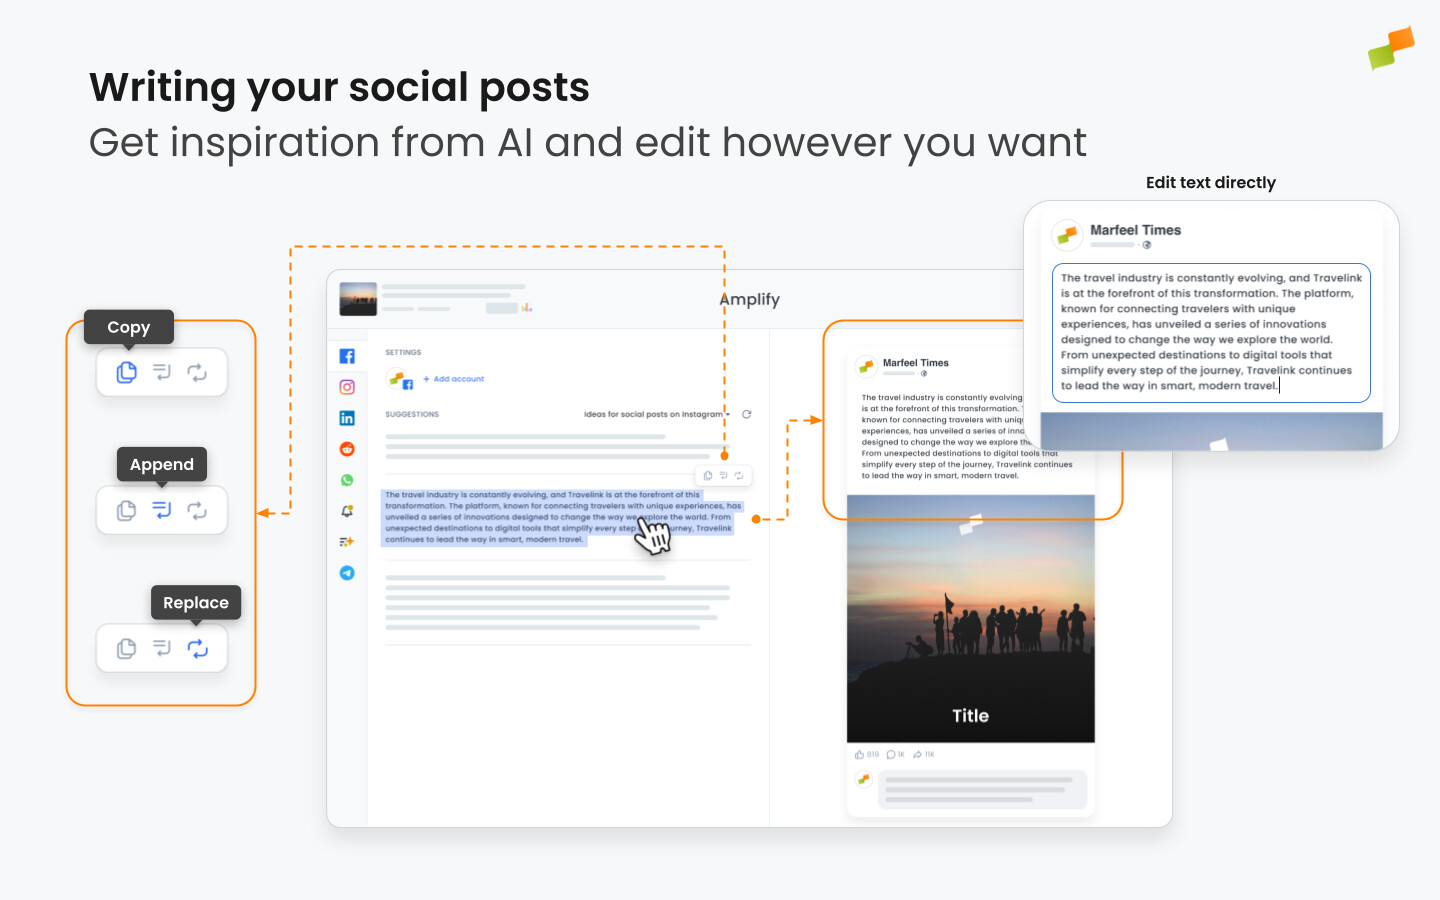
Select any of these options, tweak them, or use them as inspiration to write your own post. Click on a suggestion and it populates the post preview window, where you can edit it.
You can also hover over any suggested post to reveal a tooltip that lets you copy the text, append it to the preview copy, or replace the preview copy entirely.
Copilot prompts for post generation can be set at the global and account level, and customized as needed. Visit our documentation to learn more about Creating Copilot Prompts.
We also encourage you to visit our documentation to learn more about Marfeel Copilot, the capabilities of which extend far beyond writing copy for your Amplify posts.
Tagging your post
Section titled “Tagging your post”Every post in Amplify can be tagged. Tags are available as a filter and group-by dimension in Explore, across dashboards, workspaces, and historical reports, so you can segment and analyze post performance across any dimension you define.
You can filter by individual tag value, by tag group, or by tag family. Available filter conditions are: equals, not-equals, contains, and not-contains. The tag picker supports search-as-you-type, returning up to 100 distinct tag values per query.
System labels
Section titled “System labels”Amplify automatically applies two internal tags to every post:
recommender:name: identifies which recommender published the post. Use this in Explore to compare performance across recommenders.user:name: identifies who published the post, whether manually or via autopost. Use this to analyze output and results by social media manager.
System labels are read-only and are stripped when you duplicate a post.
Custom tags
Section titled “Custom tags”You can create any additional tags to match your own analysis needs. Common uses:
- Campaigns: tag posts belonging to a campaign to pull campaign-level performance in Explore.
- Topics or clusters: encode content categories or editorial sections to understand which themes drive engagement.
- Any dimension you need: formats, verticals, content types, experiments.
To add tags, open any post to create or edit it. The tag field is in the header of the post modal. Type to search existing tags in your account or enter a new name to create one. Custom tags carry over when you duplicate a post.
Creating a threaded conversation
Section titled “Creating a threaded conversation”A threaded conversation publishes a main post followed by one or more replies as a single sequence. Each reply in the thread can use a different post type (text, image, video, and so on). Threaded conversations are available on X (Twitter), Bluesky, and Threads.
Add replies beneath your main post in the composer before publishing. Once ready, publish or schedule the full thread as a single action. The entire thread goes live at the time you set.
After scheduling, you can return to the thread to add, edit, or remove individual replies before it goes live.
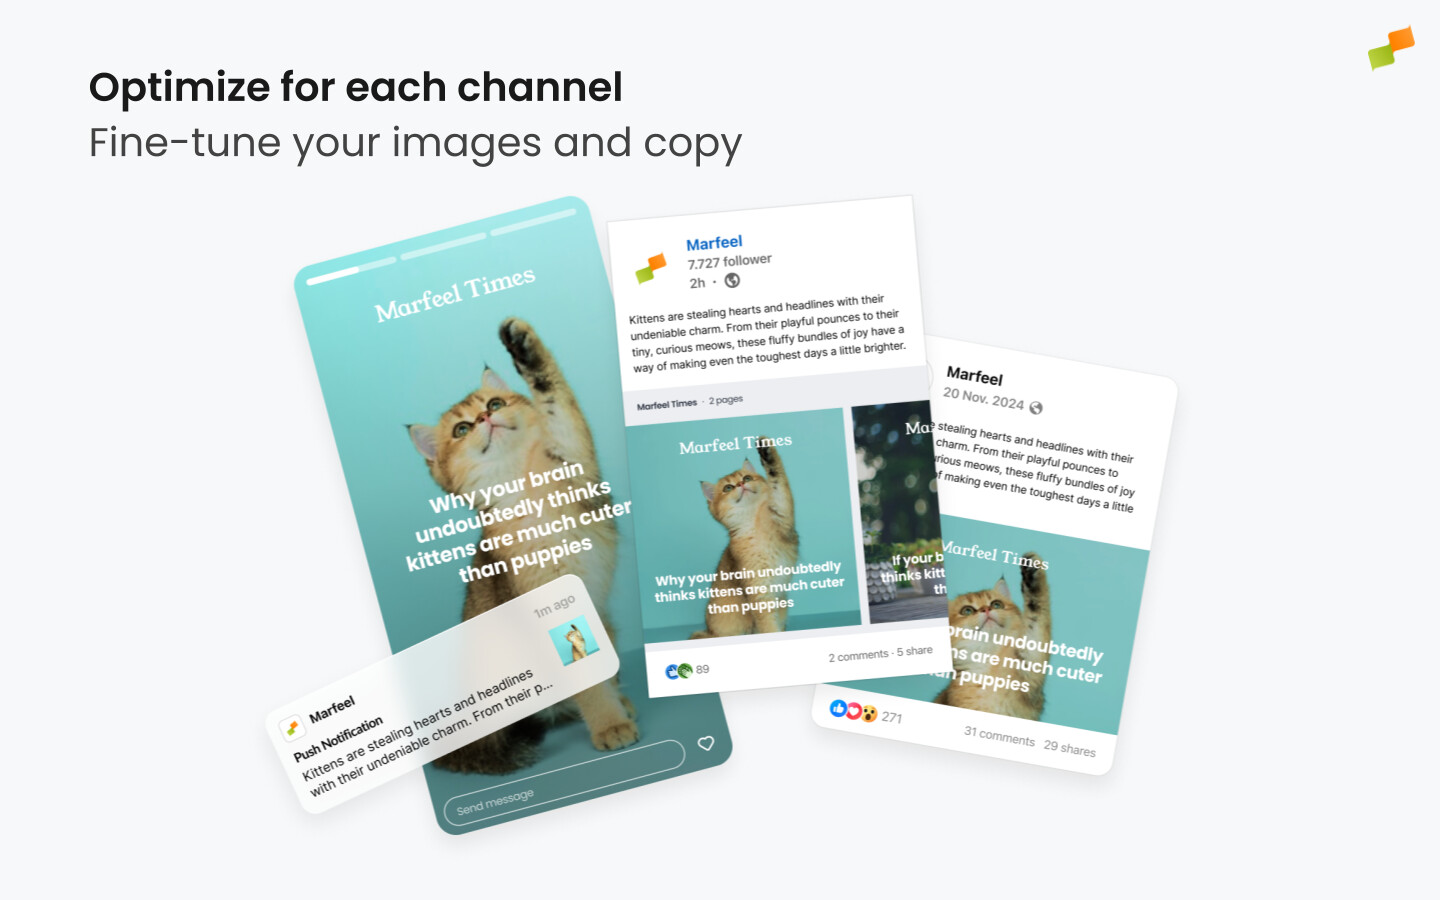
Adjusting to each channel
Section titled “Adjusting to each channel”Once you have finished creating the copy and images, verify that your post is correctly optimized for each channel where you intend to share it.
To do this:
- Click through the channels you plan to use and review how your post displays in the preview for each one.
- Check whether your text is too long or too short, or whether your image needs to be adjusted and recentered for a different aspect ratio.
- Make the necessary adjustments. Amplify saves them so that when you schedule your post, it is optimized for each channel.
Editing at the channel and feed level
Section titled “Editing at the channel and feed level”The composer’s left sidebar displays a channel tree that lets you edit a campaign at three levels: across all channels at once, within a single channel, or for one individual feed. Each row has a lock icon that controls the scope of your edits, and a calendar icon that opens a per-row schedule picker.
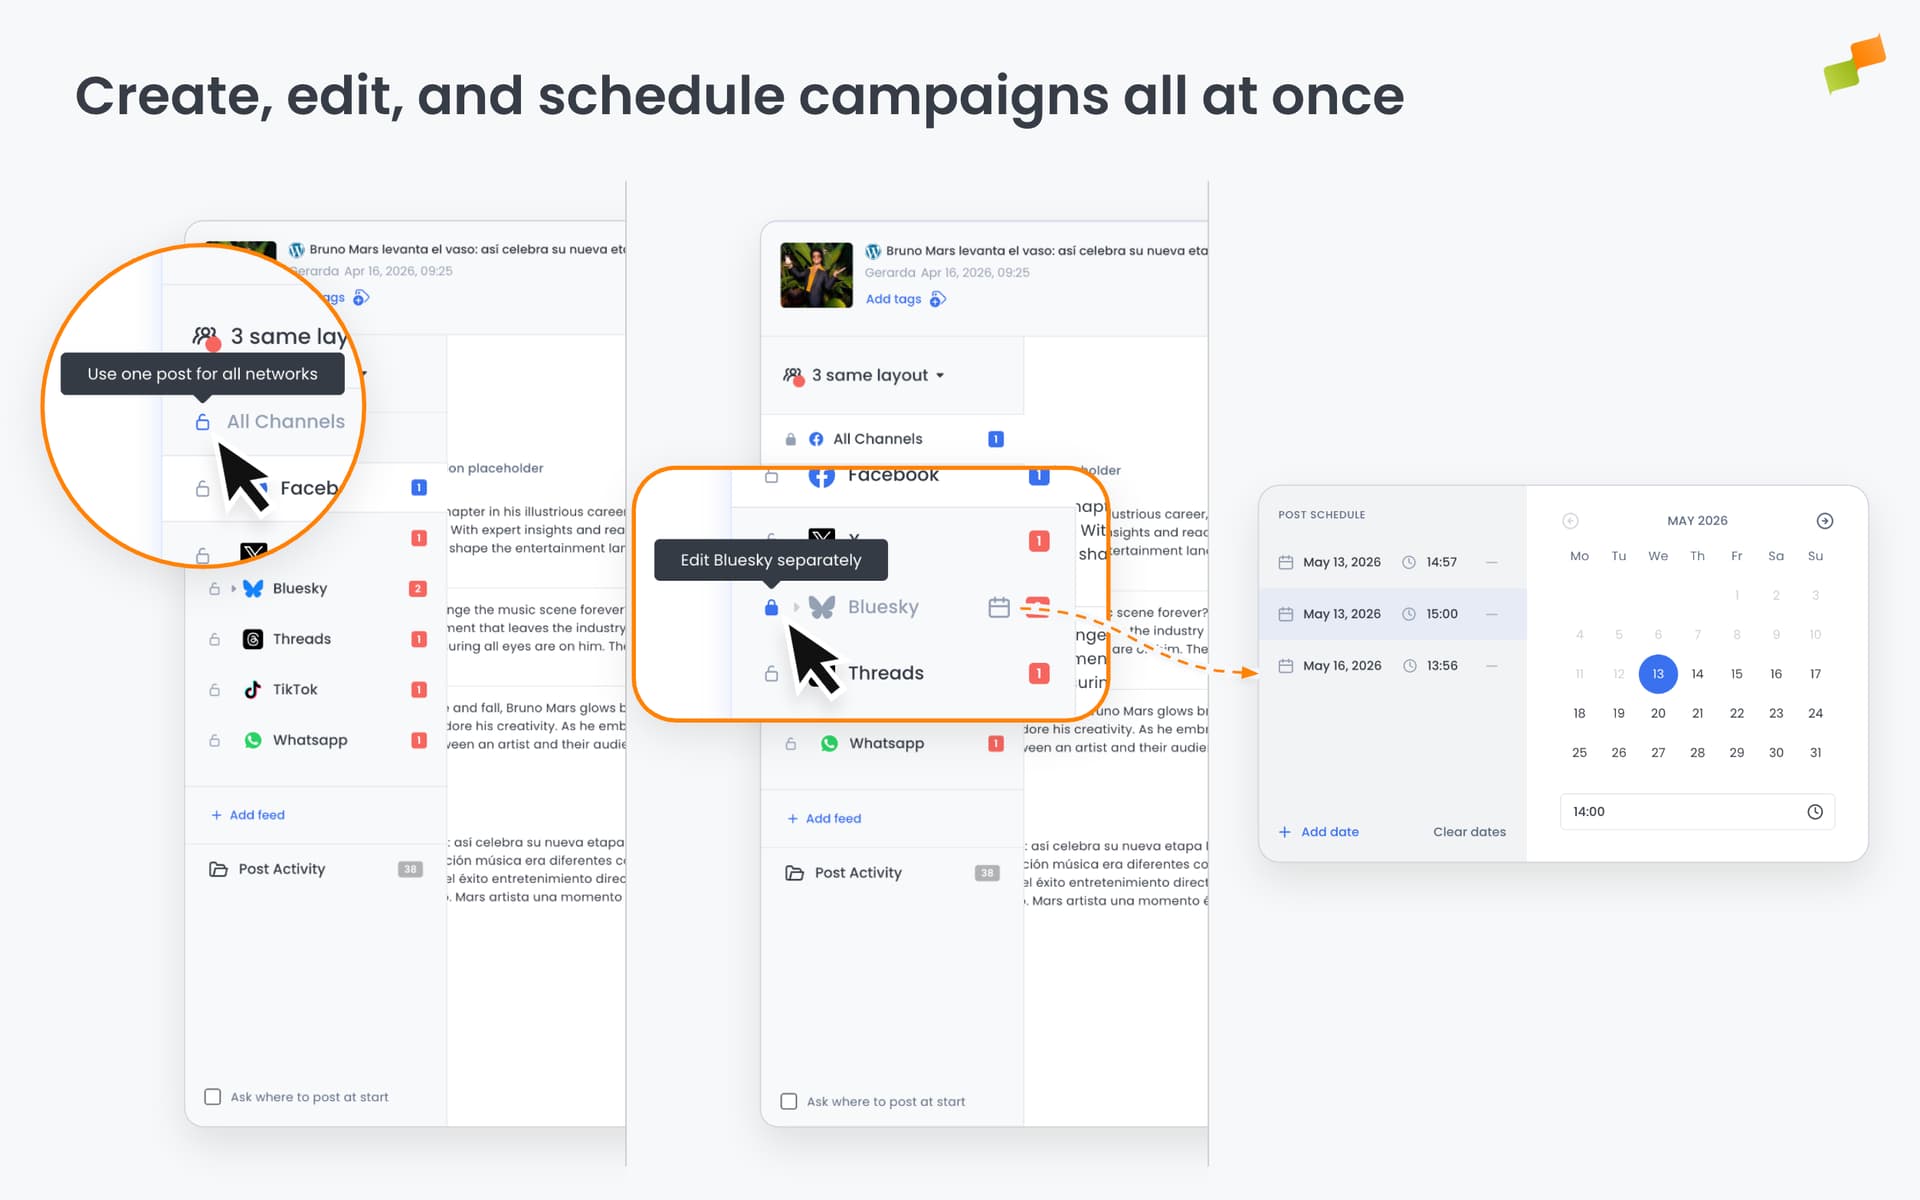
Lock a level to share the same post across everything inside it. Unlock to write a different version for that scope:
- All Channels: when locked, one post is shared across every channel and feed
- Channel: when unlocked, you can edit Facebook, Instagram, or any other channel independently from the rest
- Feed: when unlocked, you can edit one specific feed without affecting other feeds in the same channel
Locking is available for every channel except Recommender.
Per-channel and per-feed scheduling
Section titled “Per-channel and per-feed scheduling”When the global schedule does not fit, you can override the publish time for individual channels or feeds without splitting the campaign.
- Click the calendar icon next to a channel or feed row in the sidebar to open the schedule picker.
- Select one or more dates for that row. The rest of the post continues using the global schedule.
- A highlighted calendar icon on a row indicates it has a custom date. Use Clear dates to remove all overrides for that row.
Schedule overrides work at both the channel level (applies to every feed in that channel) and the feed level (overrides only that feed).
A per-row schedule takes precedence over the campaign-level publish button. If you click Publish Now or Queue, every feed without a custom date follows that action, while feeds with their own date keep their scheduled time. Draft is the exception: every row is saved as a draft regardless of per-row schedules.
Using profiles
Section titled “Using profiles”If you are posting to more than one feed and channel simultaneously, consider creating a Profile, a grouping of multiple social feeds that lets you post to all of them at once. If you have set up account-level layouts, your post transfers across all of your chosen feeds. You can also set up automated posting rules for recurring distribution across these channels.
When you save a profile, the locked or unlocked state of every channel and feed is preserved alongside the feed selection. Reloading the profile restores the exact configuration. Switching between profiles clears the previous setup before applying the new one.
Find more information on Profiles below.
Choosing channels where to publish
Section titled “Choosing channels where to publish”Social
Section titled “Social”Amplify covers the most popular social media channels: Facebook, Instagram, LinkedIn, Reddit, Threads, Bluesky, and Pinterest. Each channel has its own specificities, including distinct post types and formats that must be chosen when amplifying an article.
Post types
Section titled “Post types”Amplify supports the following post types:
- Text: Post with no media and no links, only text.
- Link preview: Post with a link in the body and no media. Most platforms show a preview with the title and main image.
- Image: Post with one image.
- Carousel: Post with multiple images.
- Story: Images in 9:16 aspect ratio published as stories on platforms that support them.
Creating stories
Section titled “Creating stories”Stories are a distinct format that often contains multiple images.
To create a story, select the story layout (9:16 aspect ratio) while creating a post for Instagram and add additional images as explained above.
When selecting your images, note that stories have a 9:16 ratio and are designed to occupy the entire mobile viewport.
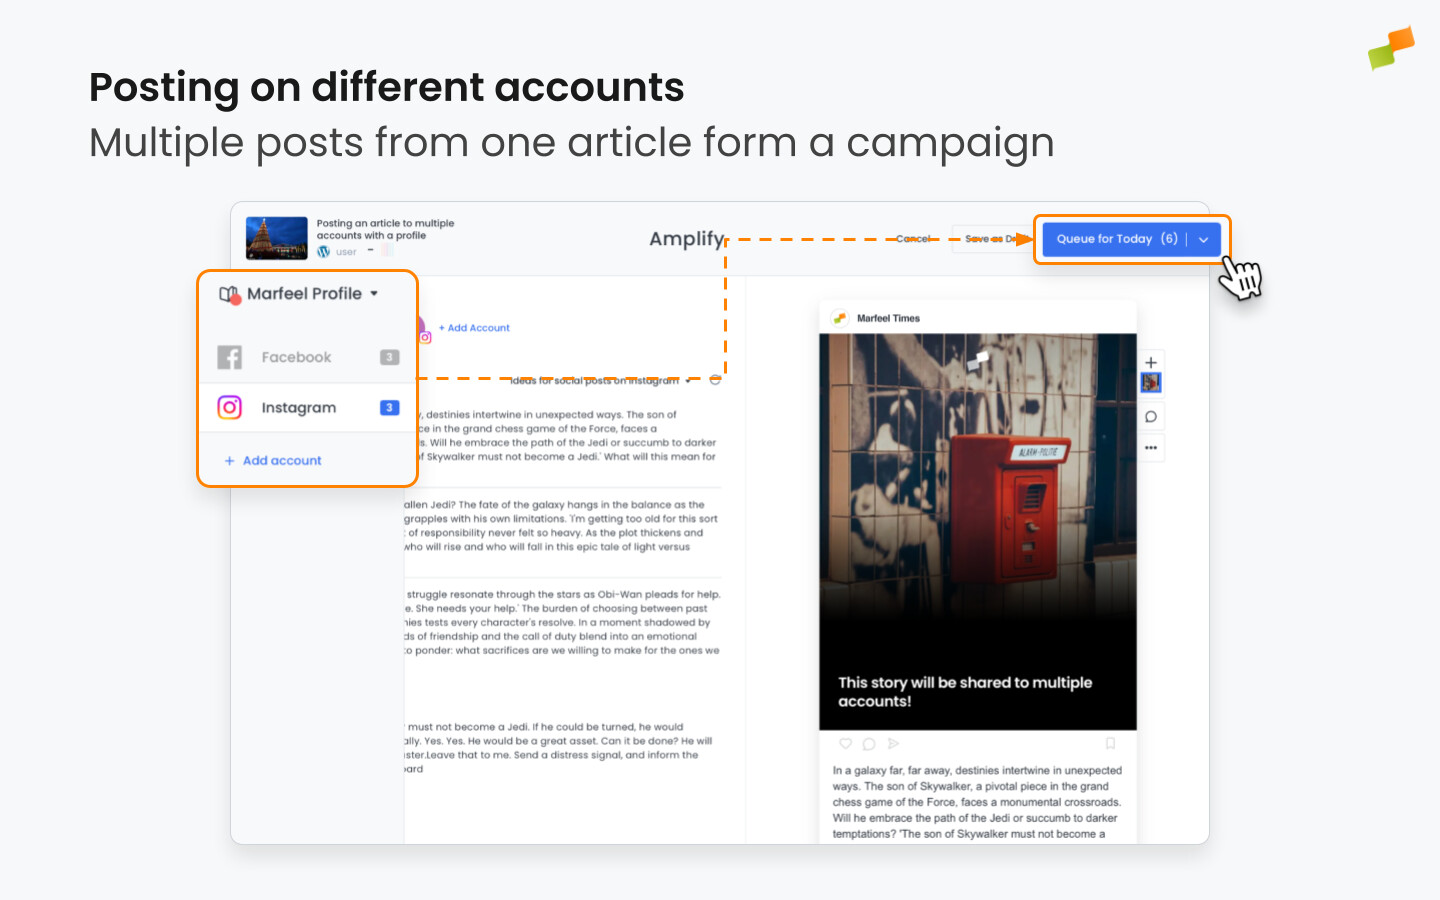
Multi-platform campaigns and profiles
Section titled “Multi-platform campaigns and profiles”Marfeel Amplify lets publishers distribute content on multiple feeds simultaneously through Profiles and Campaigns.
Whenever you post an article to multiple feeds simultaneously, it is known as a Campaign. Visualize your campaigns from the Campaigns panel and track which articles have been shared and through which feeds.
For example, a publisher with multiple feeds dedicated to politics spanning Facebook, Instagram, and LinkedIn can group them under a “Politics” Profile. When a new politics story is released, it can be published on all of those feeds simultaneously.
Creating profiles
Section titled “Creating profiles”-
To post an article using a profile, first create one. Select an article to amplify and you will see a panel to choose the feed or profile from which you want to publish.
-
Select New Profile under the profiles list.
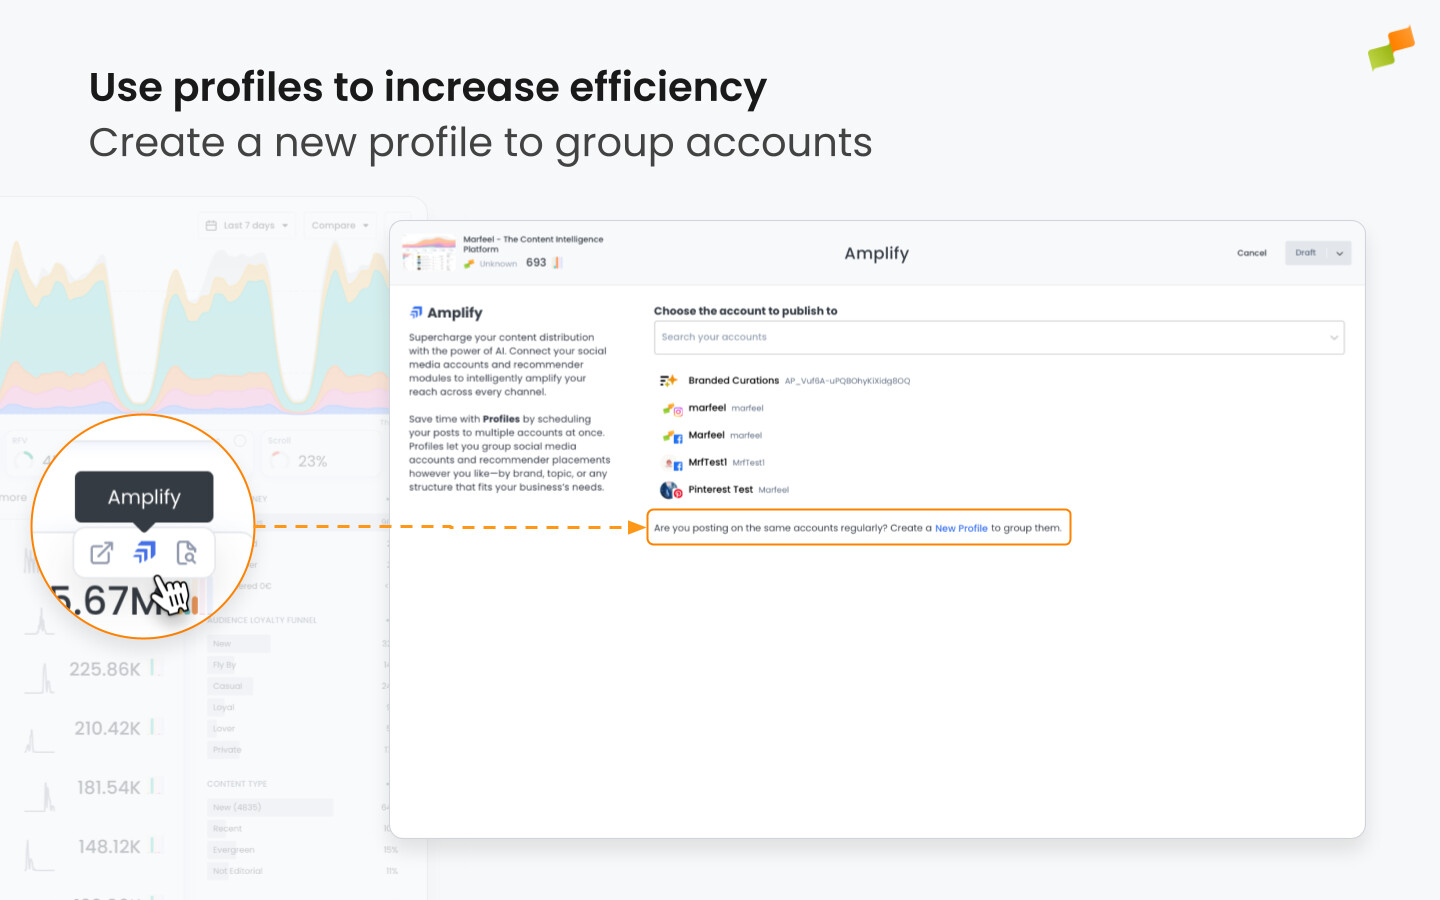
- Select the feeds you wish to include from among all connected to Marfeel, give the profile a name, and save it.
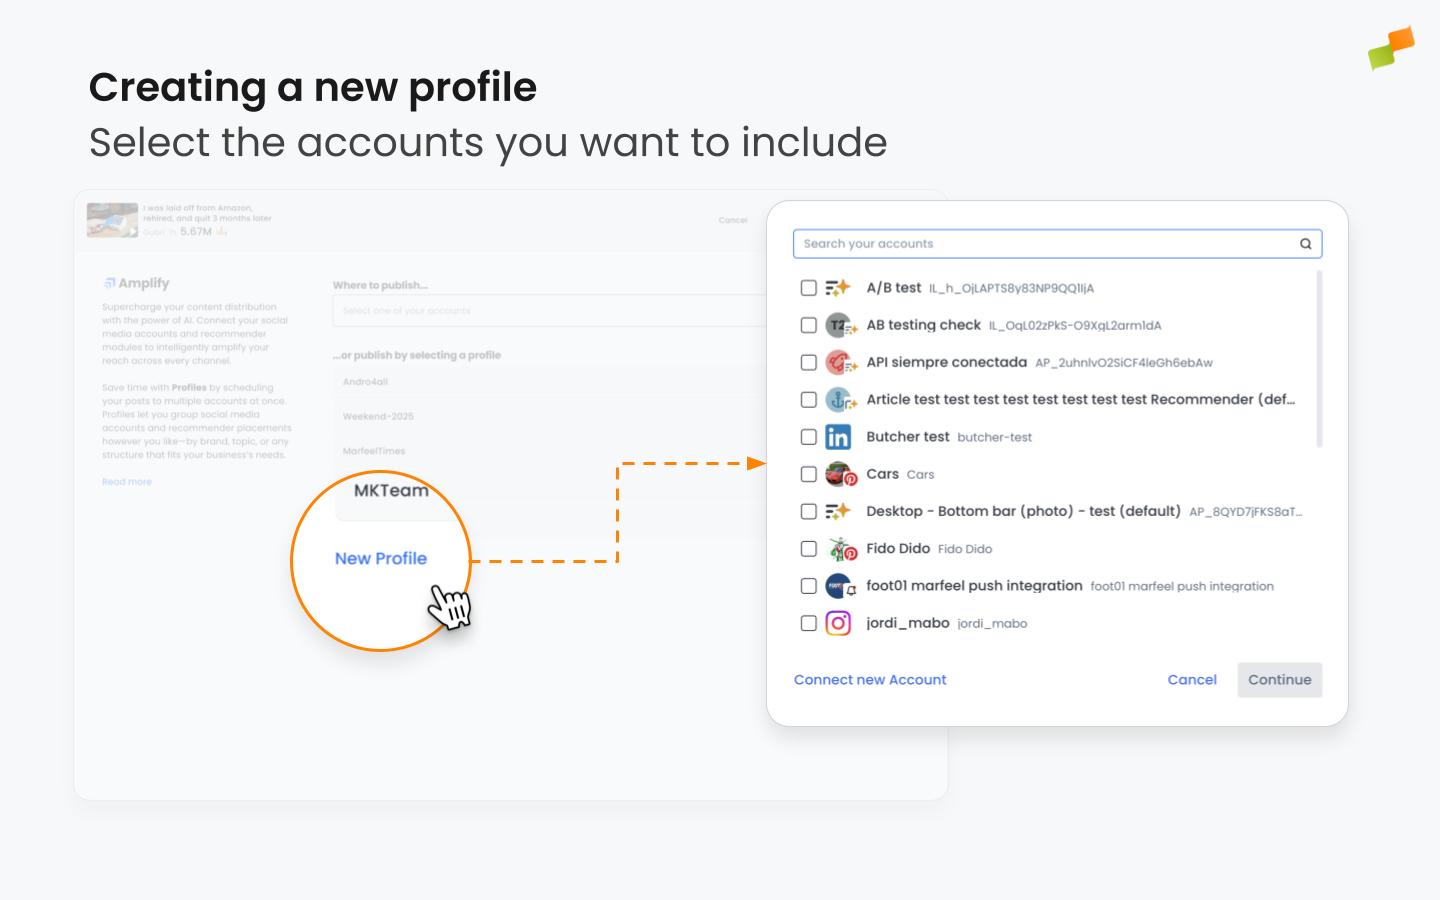
- Your new profile appears on the available list. Profiles are collaborative and can be used by all users with the appropriate permissions to access Marfeel Amplify within your organization.
Editing profiles
Section titled “Editing profiles”- Existing social profiles can be edited in Amplify. Draft a new post using the Editorial Compass, Explore, or the article detail view.

- Select the profile you wish to edit.
- Click + Add Feed to add or remove social feeds, then click Confirm. A red dot appears on the book icon to the left, indicating unsaved changes. To save your changes, open the dropdown menu by clicking the arrow, then select Save Profile.

Publishing or scheduling your post
Section titled “Publishing or scheduling your post”With channel-specific optimization done, decide the timeline for publication. Amplify offers four options:
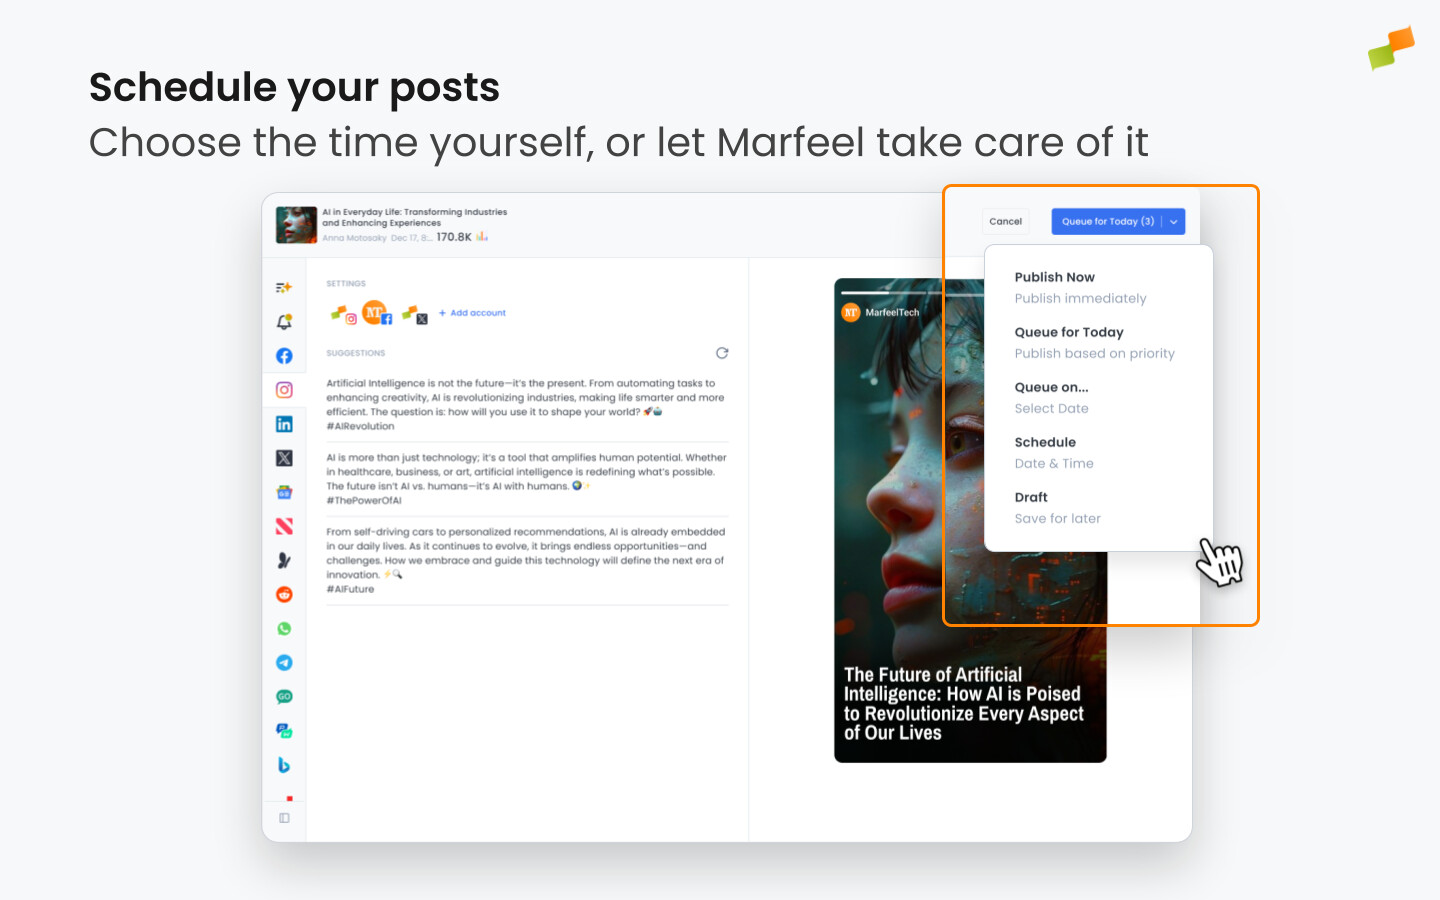
Publish Now
Section titled “Publish Now”Sends your post immediately via the selected feeds. Typically used for breaking news.
Queue for Today
Section titled “Queue for Today”Places your post in the Queue list to be sent at the best time during the current day. Use this for high-priority stories that need to be on social media but are not time-sensitive.
Queue on…
Section titled “Queue on…”Choose a future date, and Amplify automatically places your post on that day’s Queue to be posted at an optimal time slot. Use this for content that is not urgent but still valuable: a reminder before an event, a teaser for an upcoming launch, or a high-performing post that deserves another chance to reach your audience.
Schedule
Section titled “Schedule”Lets you choose the exact date and time for your post to be published. Use this to plan social media content to coincide with specific events such as the Superbowl, the Oscars, or an election.
Timezone
Section titled “Timezone”When you schedule a post, Amplify uses the feed’s configured timezone by default.
If your browser’s timezone differs from the feed’s timezone, a warning appears in the composer before you confirm. At that point, you can choose which timezone to apply:
- Feed timezone: the post goes live at the time set for the feed
- Local timezone: the post goes live at the time shown in your browser
- Custom timezone: select any timezone from the dropdown in the composer
When scheduling to multiple channels simultaneously, you can decide whether each channel publishes at its own configured timezone or all channels share the same one.
Any Amplify post you are working on can be saved as a draft, making it accessible to others for collaboration. This enables workflows for review, editing, sign off, and scheduling.
After you have chosen an option and confirmed, your post is ready to be shipped when and where you want.
Posting and tracking links
Section titled “Posting and tracking links”Amplify automates the process of linking to your articles and assigning the relevant parameters to your URLs for accurate tracking. Visit our dedicated article to learn more about posting and tracking links.
How do I create a social media post in Marfeel Amplify?
You can create a post from an article or from scratch. To post from an article, hover over any article entry in Compass, Amplify feeds, or Explore and click the Amplify icon. To post from scratch, go to Posts, Campaigns, Feeds, or Channels and click New Campaign to open a blank composer.
What post types does Amplify support?
Amplify supports text posts, link previews, single images, carousels with multiple images, and stories in 9:16 aspect ratio. Available post types vary by channel and can be selected in the right-hand panel of the composer.
How do I schedule or publish a post in Amplify?
Amplify offers four publishing options: Publish Now for immediate delivery, Queue for Today to post at the best time during the current day, Queue on a future date for non-urgent content, and Schedule for an exact date and time. Posts can also be saved as drafts for team collaboration.