
Amplify feeds, recommendations, and scheduling
Feeds provide a dynamic timeline for each of your distribution feeds, capturing past, present, and upcoming activity. They help you track performance, analyze trends, and plan future distribution.
🎓 Master Amplify, step by step 📊 The video below is an excerpt from the Amplify Fundamentals course.
🧠 Discover more learning paths on Marfeel Academy.
Multi-feed view
Section titled “Multi-feed view”The Feeds panel displays all your connected feeds and their engagement metrics in one place. Access it through the left sidebar to compare follower growth, clicks per follower ratio, posts per day, and more across every feed at a glance.
Feeds are sorted by views to highlight impact. Predictive analytics show how current performance compares to historical trends, making it easy to identify opportunities for deeper analysis or immediate action.
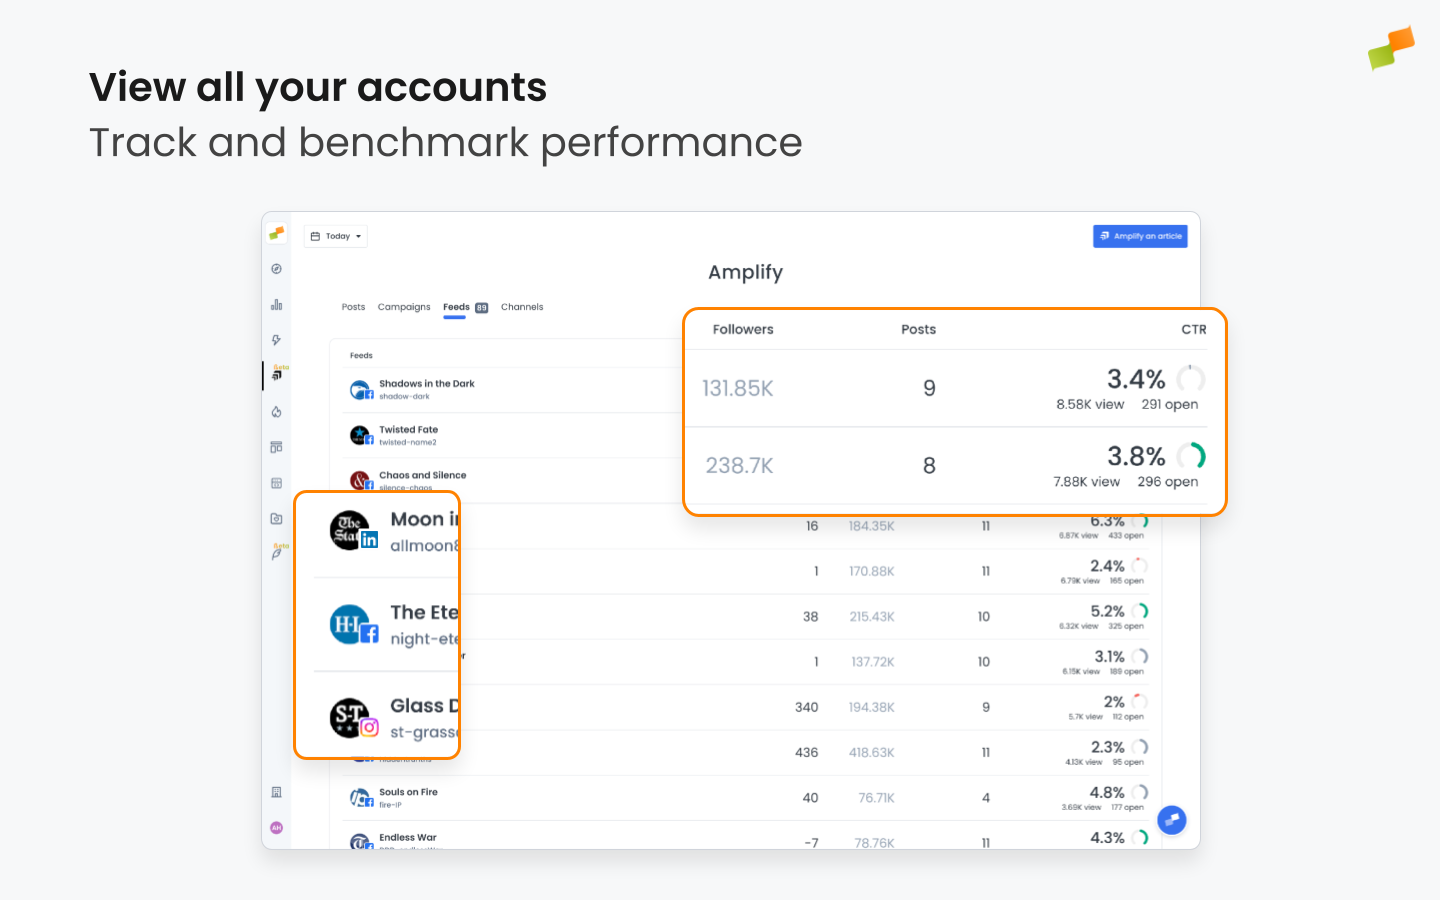
Clicking on any Feed will open up its Feed Details.
Feed Details
Section titled “Feed Details”Select any feed from the multi-feed view to open a dedicated panel with detailed metrics for that feed.
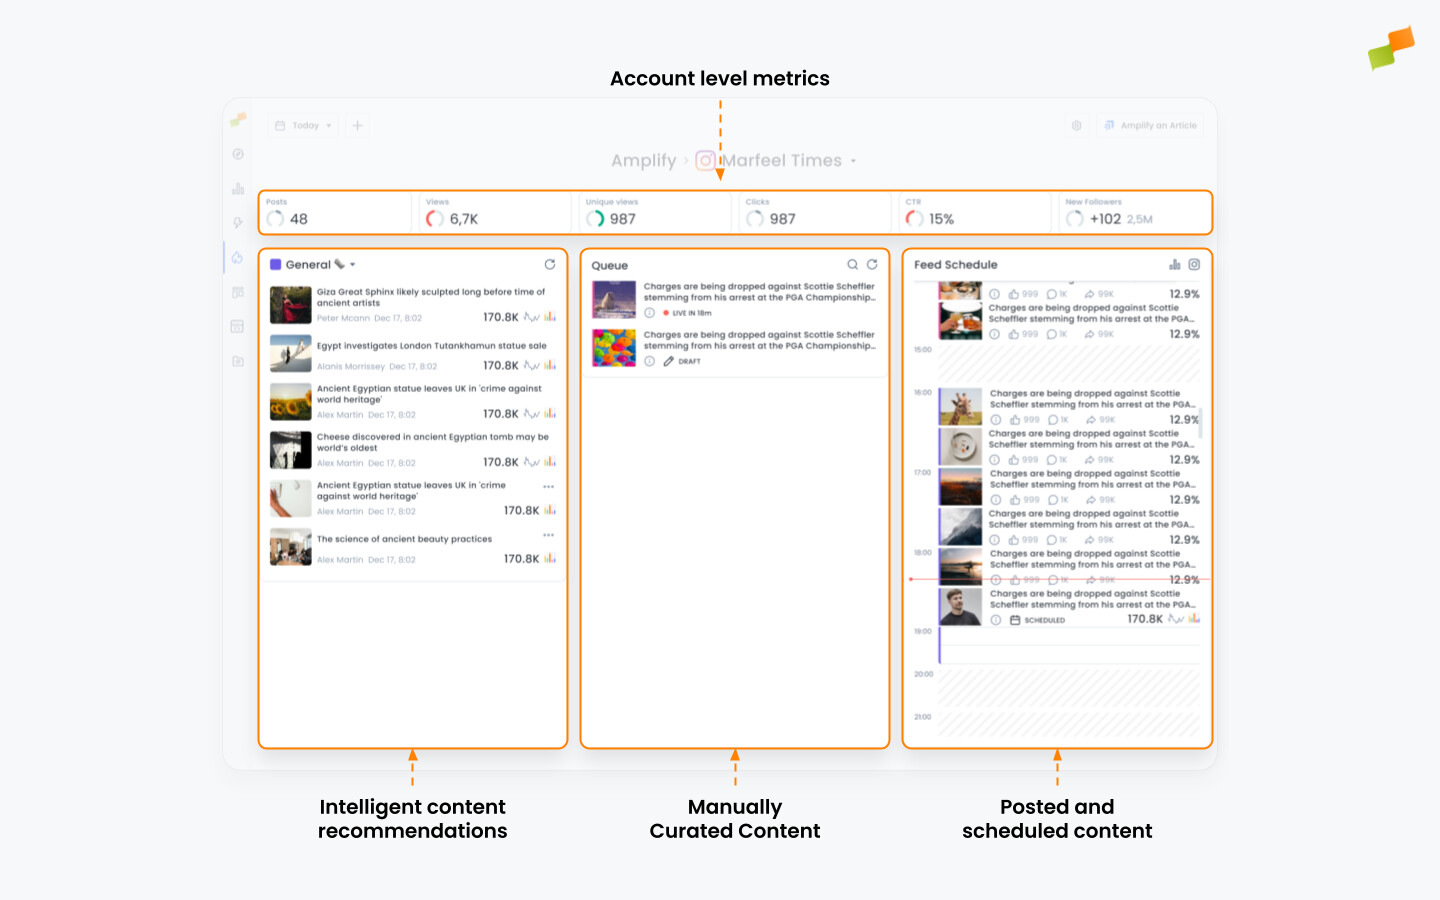
Ctrl/⌘+K.The Feed Details panel is divided into four areas: Feed Level Metrics, Smart Recommendations, Queue, and Feed Schedule.
Feed level metrics
Section titled “Feed level metrics”The top row displays feed-specific metrics bound by the selected timeframe, which you can change using the date picker in the top left corner. All metrics incorporate predictive analytics so you can compare your performance against historical trends.
Smart Recommendations
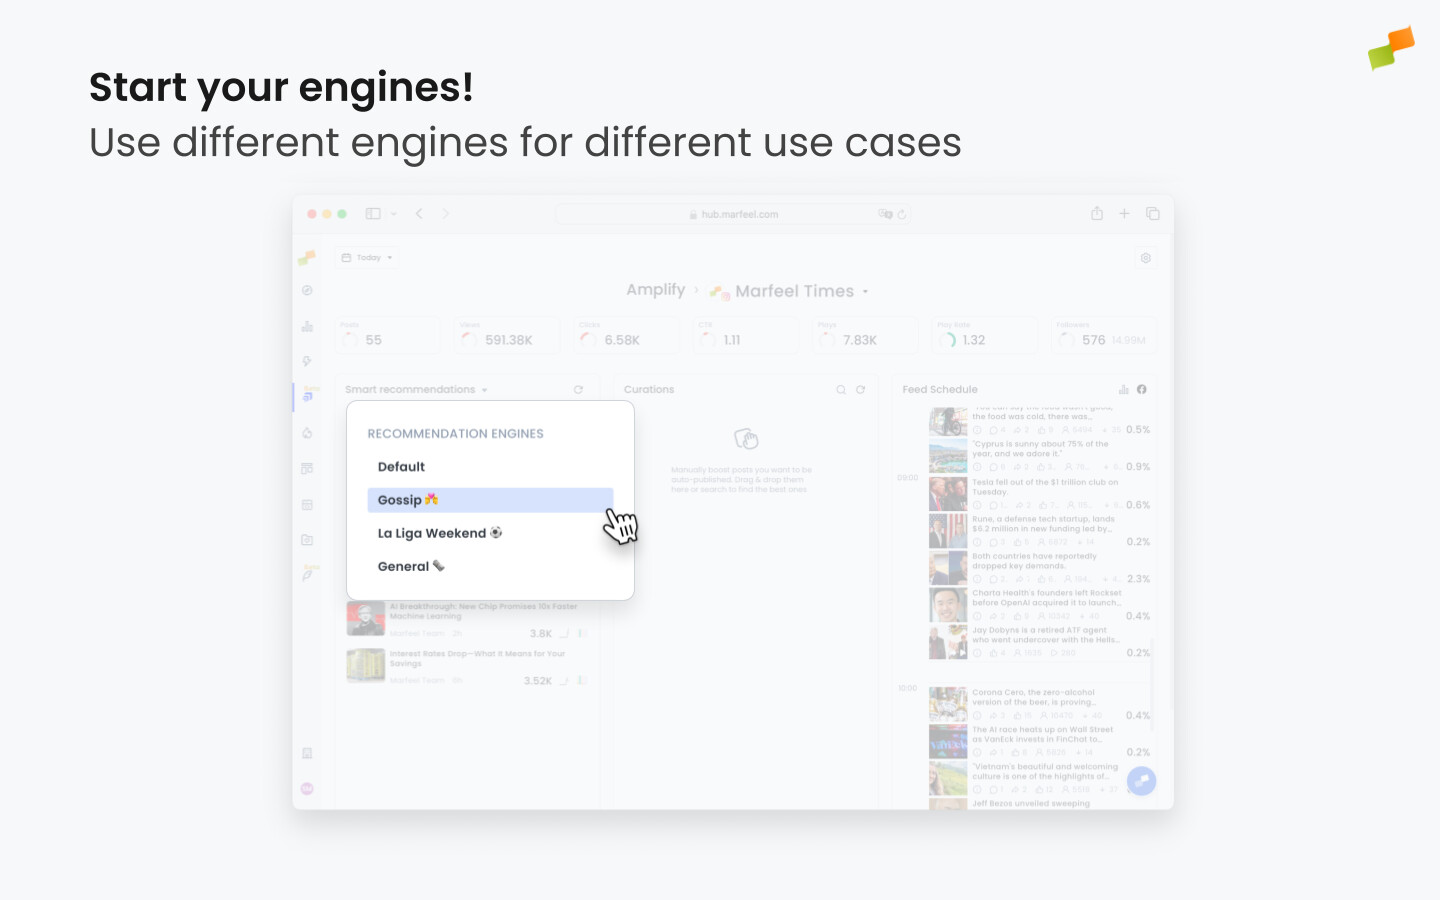
Section titled “Smart Recommendations”The left column shows recommended articles for posting on the selected feed based on your chosen recommendation engine. Each feed can use multiple recommenders with different criteria, letting the team schedule different content depending on the moment. Switch recommenders using the dropdown next to the feed title. For setup, see this section.
The central column shows posts queued for today. Editors can use the Queue to manually specify which stories to distribute, taking precedence over Marfeel’s automated recommendations when on Autopilot mode.
Feed Schedule
Section titled “Feed Schedule”Feed Schedule is a calendar timeline showing published articles with their performance metrics and upcoming scheduled posts. It also displays the time blocks assigned to a recommender engine. Read more on using the Feed Schedule.
🎓 Become a Marfeel Amplify expert 📣 Learn how to publish smarter, automate sharing, and optimize your social strategy with our Marfeel Amplify Course.
✅ Workflow-focused training ✅ Automation strategies ✅ Certificate of completion included
🧠 Start now on Marfeel Academy.
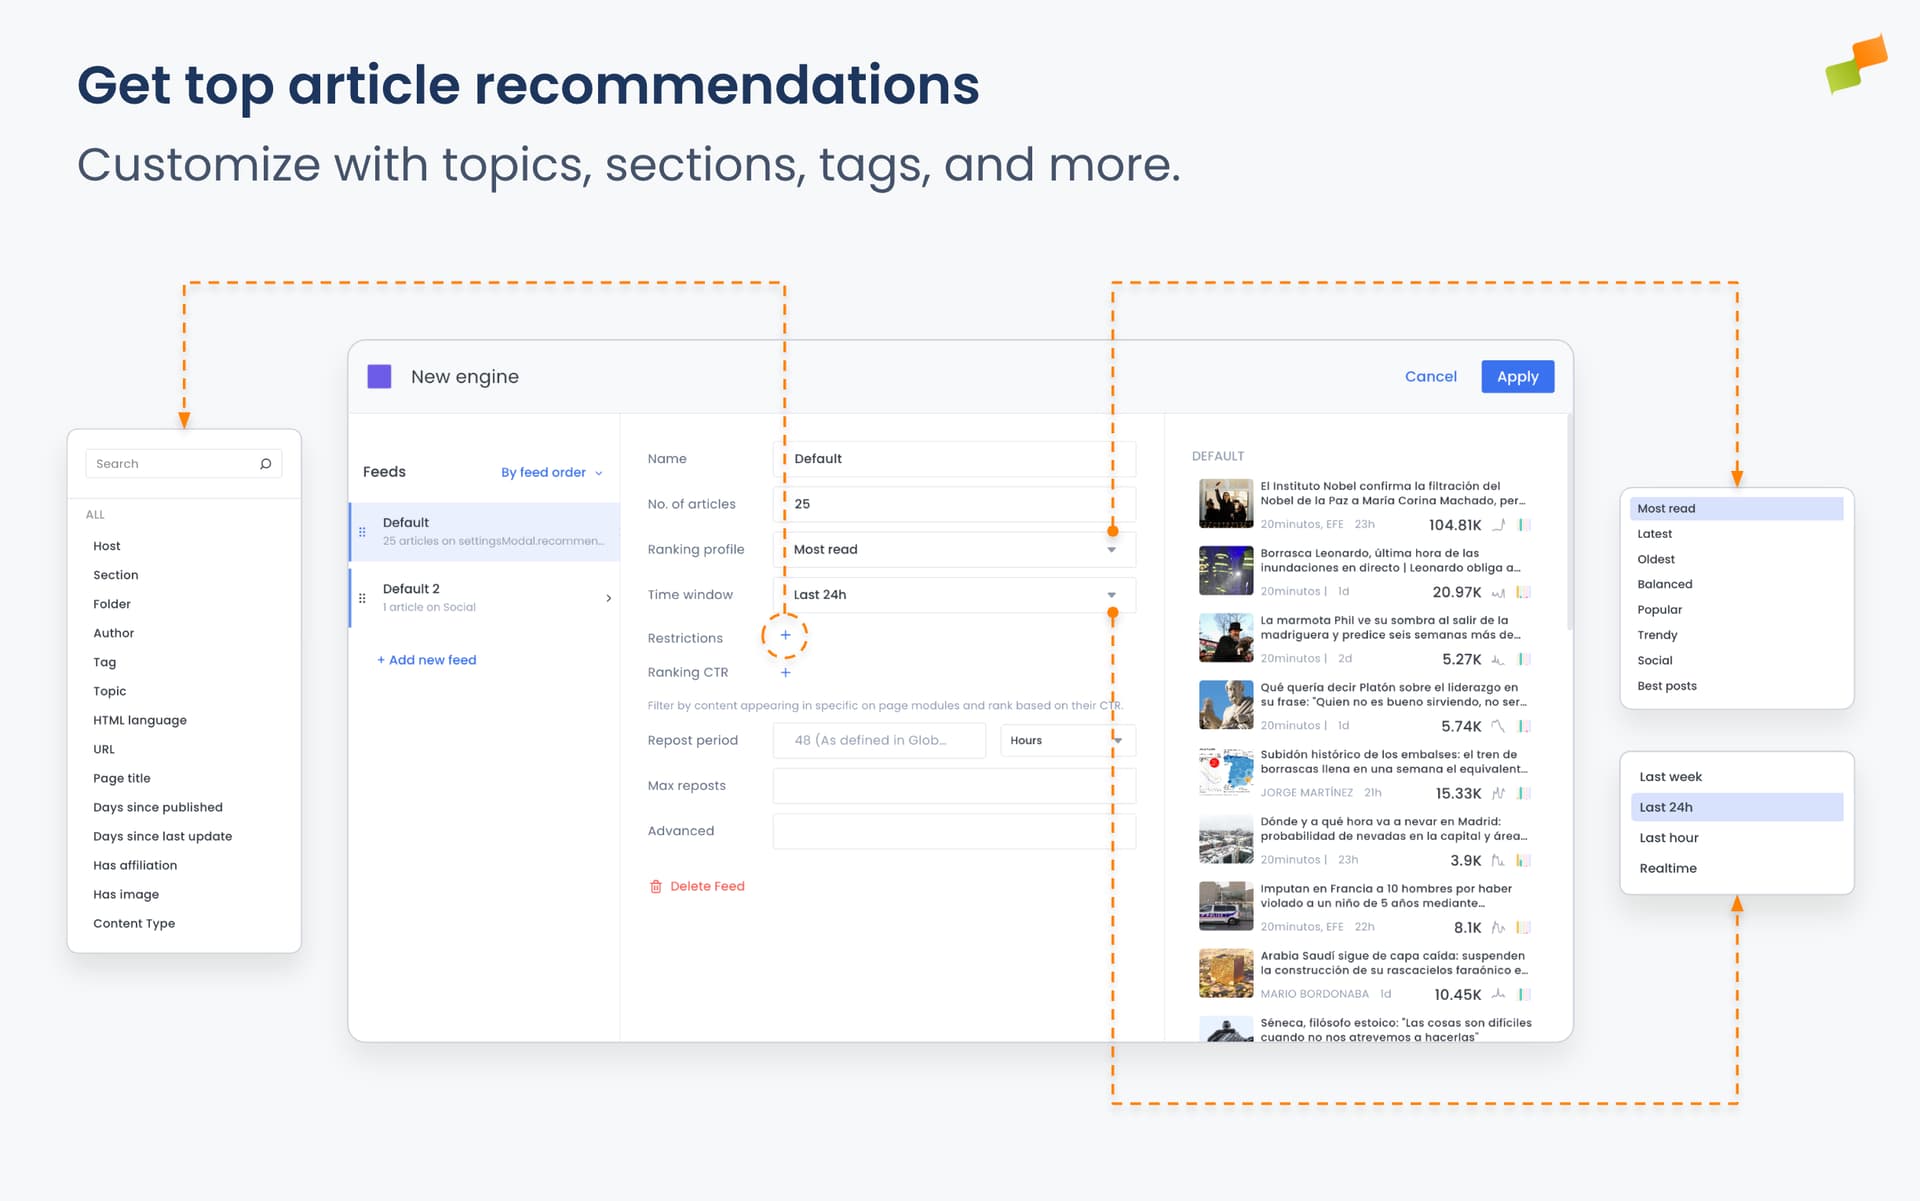
Setting up recommendation engines
Section titled “Setting up recommendation engines”Recommenders analyze your content using various criteria and suggest articles likely to perform well on each feed. Recommended pieces appear in the Smart Recommendations column of the Feed Details panel, from where they can be published on your feeds.
-
To set up a recommendation engine, click on the Settings
⚙symbol in the top right and navigate to the Recommenders tab. -
You will be presented with a list of the Recommenders that are currently set up for the feed. You can edit any of these by clicking on the edit button on the right, or create a new one by clicking on the
+ New Recommenderbutton.
-
Choose a name for the recommender and the color it will have in your Feed Schedule calendar.
-
Choose the ranking profile that the engine will use to rank content. The options are:
- Most Read: Lists articles sorted by overall traffic to attract users to content with proven broad appeal.
- Latest: Lists the most recently published articles on your site to promote breaking news and ensure users see the newest updates first.
- Balanced: General recommendations for broad audiences, ensuring all types of content get visibility without over-prioritizing one signal.
- Popular: Weights the popularity signal above the rest to highlight successful articles in terms of traffic without losing sight of other signals.
- Trendy: Features articles with a sharp increase in traffic over short periods to leverage current momentum and engage users.
- Social: Adapts to your feed, recommending the articles that will work best on it based on past performance.
- Best posts: Lists articles you’ve previously posted in your feed that earned the highest social interactions, perfect for identifying top-performing content to repost.
-
Select the Time Window to be considered for ranking articles based on their visits.
-
Apply Restrictions using Marfeel’s dimensions. For example, you can force the engine to only promote articles from certain Sections, Topics, or Authors, or you can use custom Tags inserted at the CMS level to filter your recommendations. Learn more about applying restrictions to your recommender.
Apart from common Recommender restrictions, in Amplify recommendations can be filtered by urls containing or not any string. -
(Optional) Save the restriction configuration as a Saved Restriction so you can reuse it across other recommenders. Click Save restriction in the content restrictions section, give it a name, and it becomes available in any recommender on this feed. To apply a saved restriction to a recommender, select it from the saved restrictions option in the content restrictions field. The active saved restriction name is shown in the Recommenders table so you can see which rules each recommender is using at a glance.
-
(Optional) Use the Ranking CTR filter to refine recommendations based on recirculation performance. Select a source of recirculation data (for example, some modules on the homepage) to filter recommendations to only articles appearing in those modules, ranked by their CTR performance.
Only articles with more than 50 impressions during selected Time Window will be elegible to be recommended.
Changes in Ranking CTR configuration take ~5 minutes to be applied to recommendations, and changes are not reflected in the preview. -
Configure how articles already posted should show up in your feed:
- Repost Period defines how much time must pass before an already posted article can be suggested again.
- Max Reposts defines how many times an article can be reposted before it is excluded from recommendations. It will only consider reposts during the last 30 days. You can set this value to 0 if you do not want already posted articles to ever be suggested in your feed.
Repost Period and Max Reposts inherit their default values from Account and Global settings. -
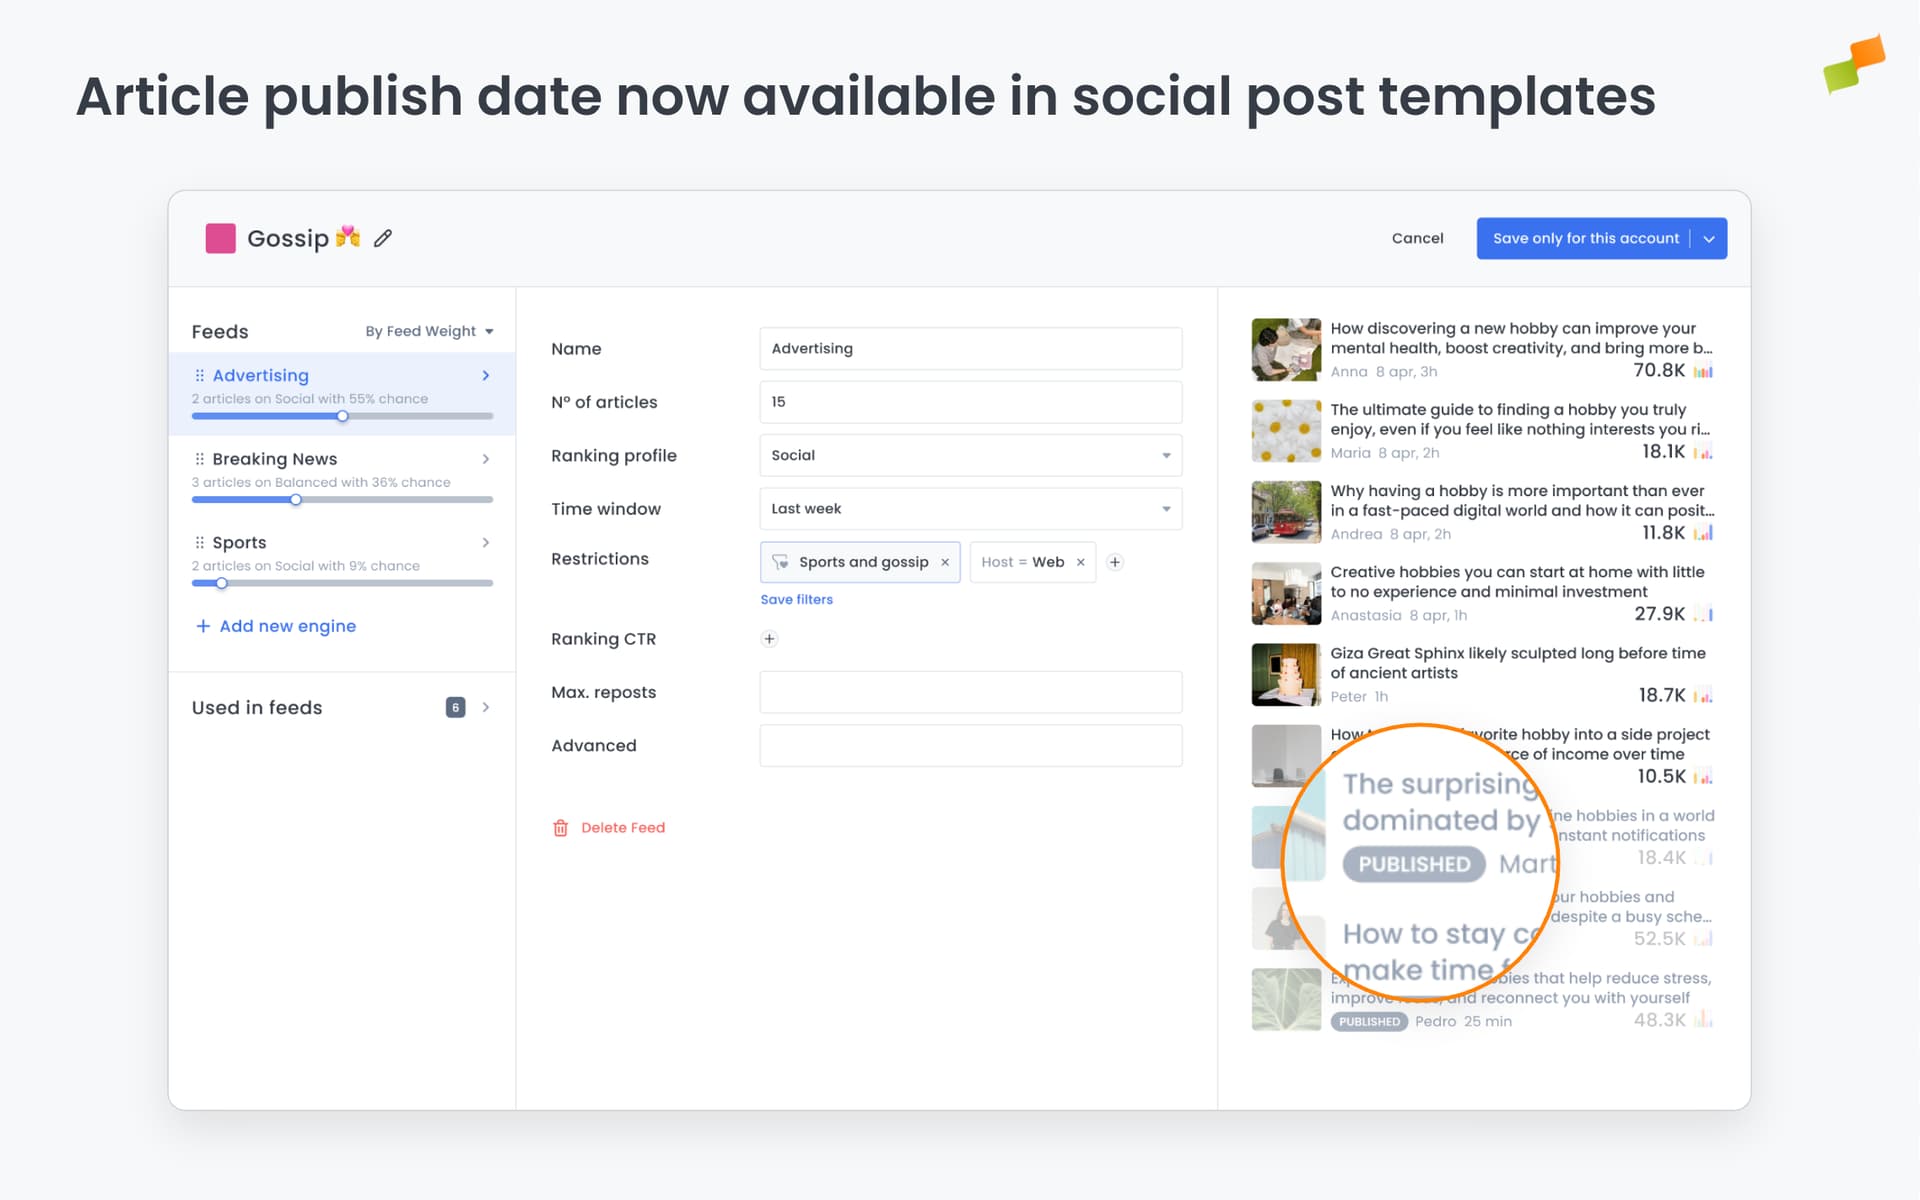
The article preview on the right side of the configuration panel shows which articles the recommender would surface. Articles already posted to social media display a Published badge so you can see at a glance what has already been shared without leaving the configuration view.
-
After you’ve finished setting up and have saved your recommender, you will be able to select it and put it to work in the Smart Recommendations column through the dropdown list.
Sharing a recommender across feeds
Section titled “Sharing a recommender across feeds”If you manage multiple feeds with the same recommendation logic, you can share a single recommender across all of them instead of maintaining separate copies. Any change you make to a shared recommender propagates to every feed using it immediately.
- Go to Settings > Recommenders and open the options menu for the recommender you want to share.
- Select Share with other feeds.
- Choose which feeds should use this recommender.
Once shared, the recommender behaves as follows:
- Editing: Only the feed that originally shared the recommender can edit it. Feeds using a shared recommender can apply it but cannot modify its configuration.
- Deleting: A shared recommender cannot be deleted while it is in use on other feeds. If active scheduled posts depend on it, Amplify will warn you before allowing the action.
- Unsharing: Select Unshare from the options menu to stop sharing with all feeds at once, or open the share modal from the original feed and deselect individual feeds to stop sharing selectively.
Cloning a recommender to other feeds
Section titled “Cloning a recommender to other feeds”Use cloning when you want to use an existing recommender as a starting point and adjust the copy independently — for example, to apply a different ranking profile or restrictions to a specific feed.
- Go to Settings > Recommenders and find the recommender you want to use as a template.
- Select Clone to feeds from the action menu.
- Pick one or more target feeds from the picker. Your current feed appears at the top for reference.
- Confirm. A summary shows how many feeds updated successfully and which ones encountered an issue.
If you clone to your current feed, the new recommender appears immediately without a page reload.
Configuring multiple feeds on your Recommender
Section titled “Configuring multiple feeds on your Recommender”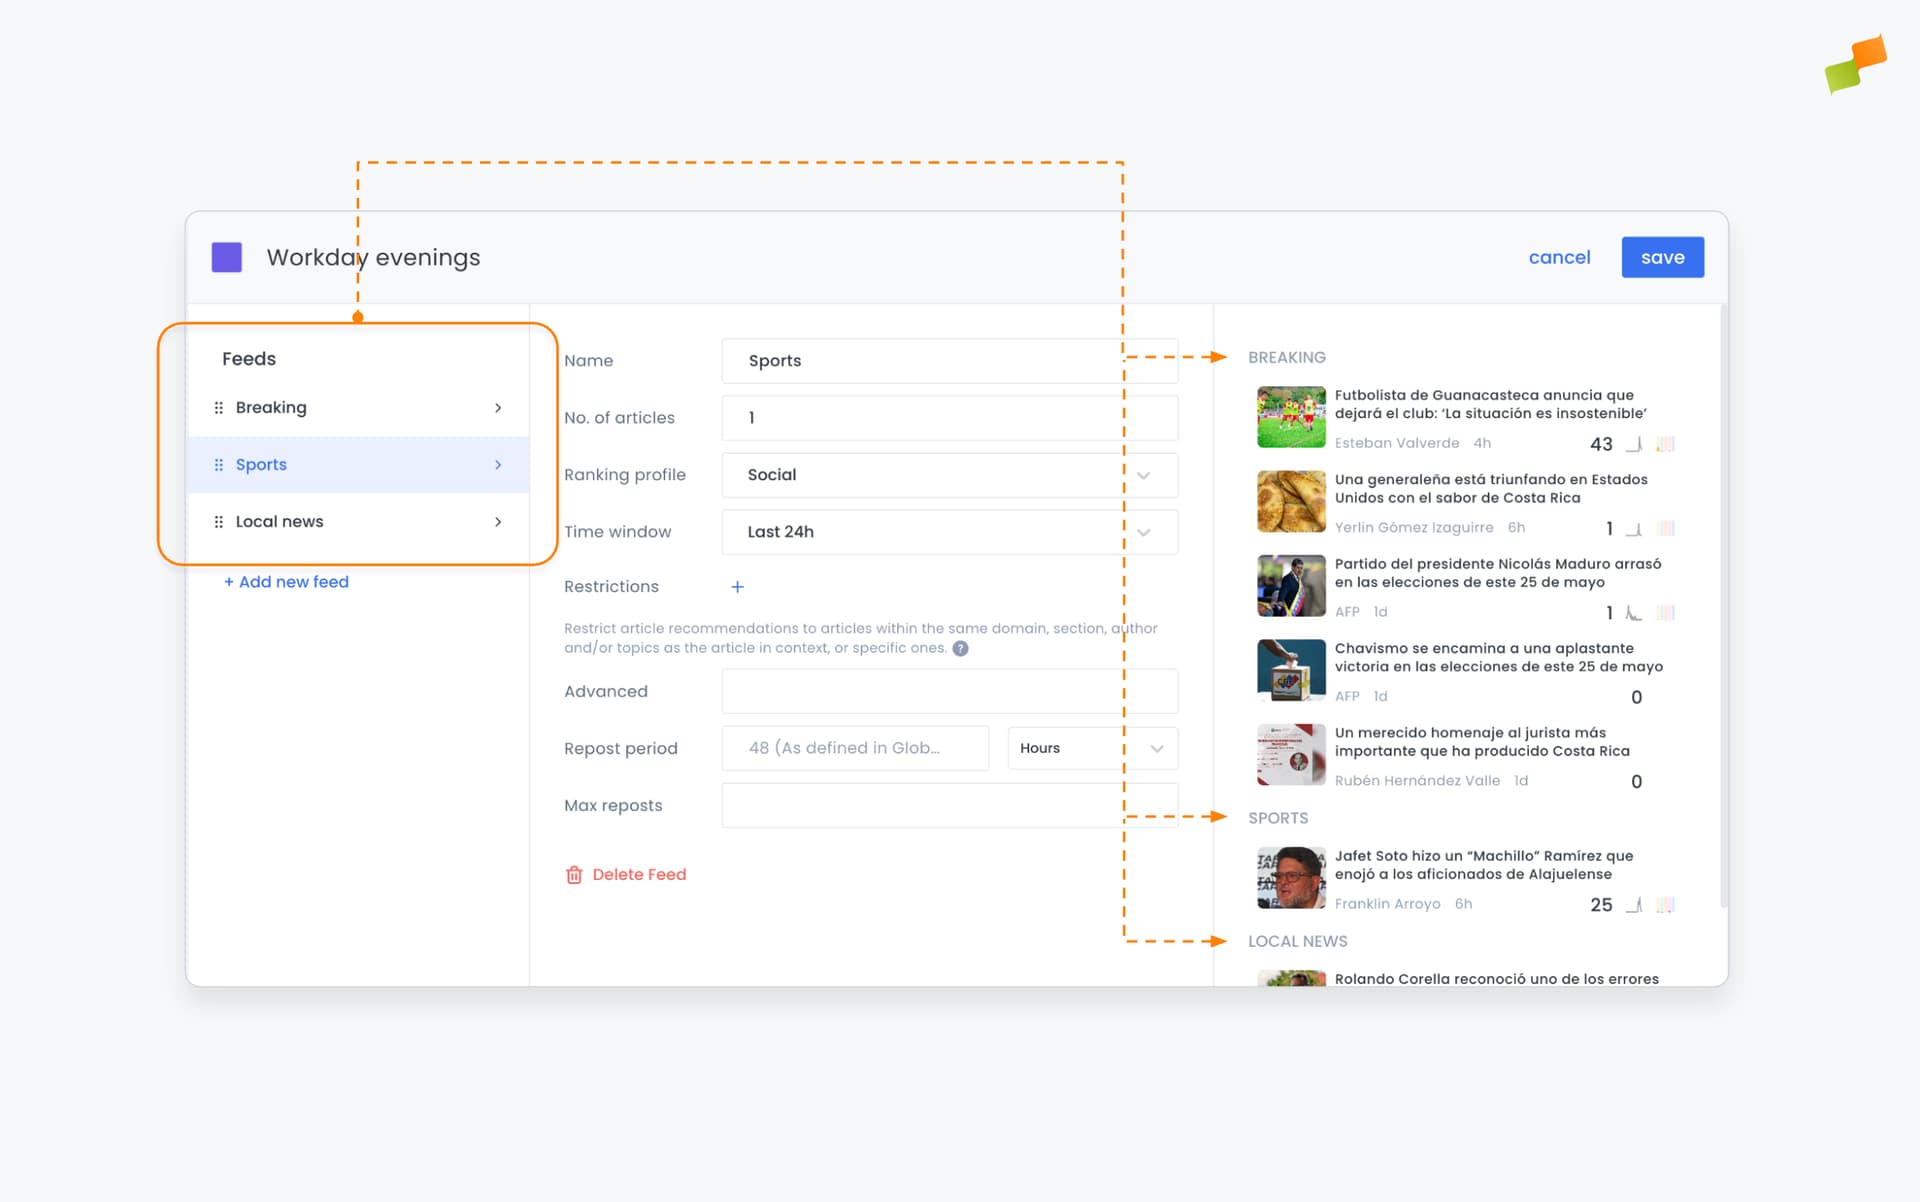
Recommenders can support complex use cases by configuring multiple feeds inside them. Each feed returns a number of articles that match the configured restrictions, sorted by its ranking profile.
Use multiple feeds to include diverse groups of articles in your Smart Recommendations column and as fallbacks for Autopilot mode.
Using the Feed Schedule
Section titled “Using the Feed Schedule”The Feed Schedule displays all published posts and upcoming scheduled posts in a calendar format.
The schedule is fully interactive. Drag articles from the Smart Recommendations and Queue columns and drop them into the calendar to schedule them for publication at the selected time. Existing scheduled items can also be moved by clicking and dragging.
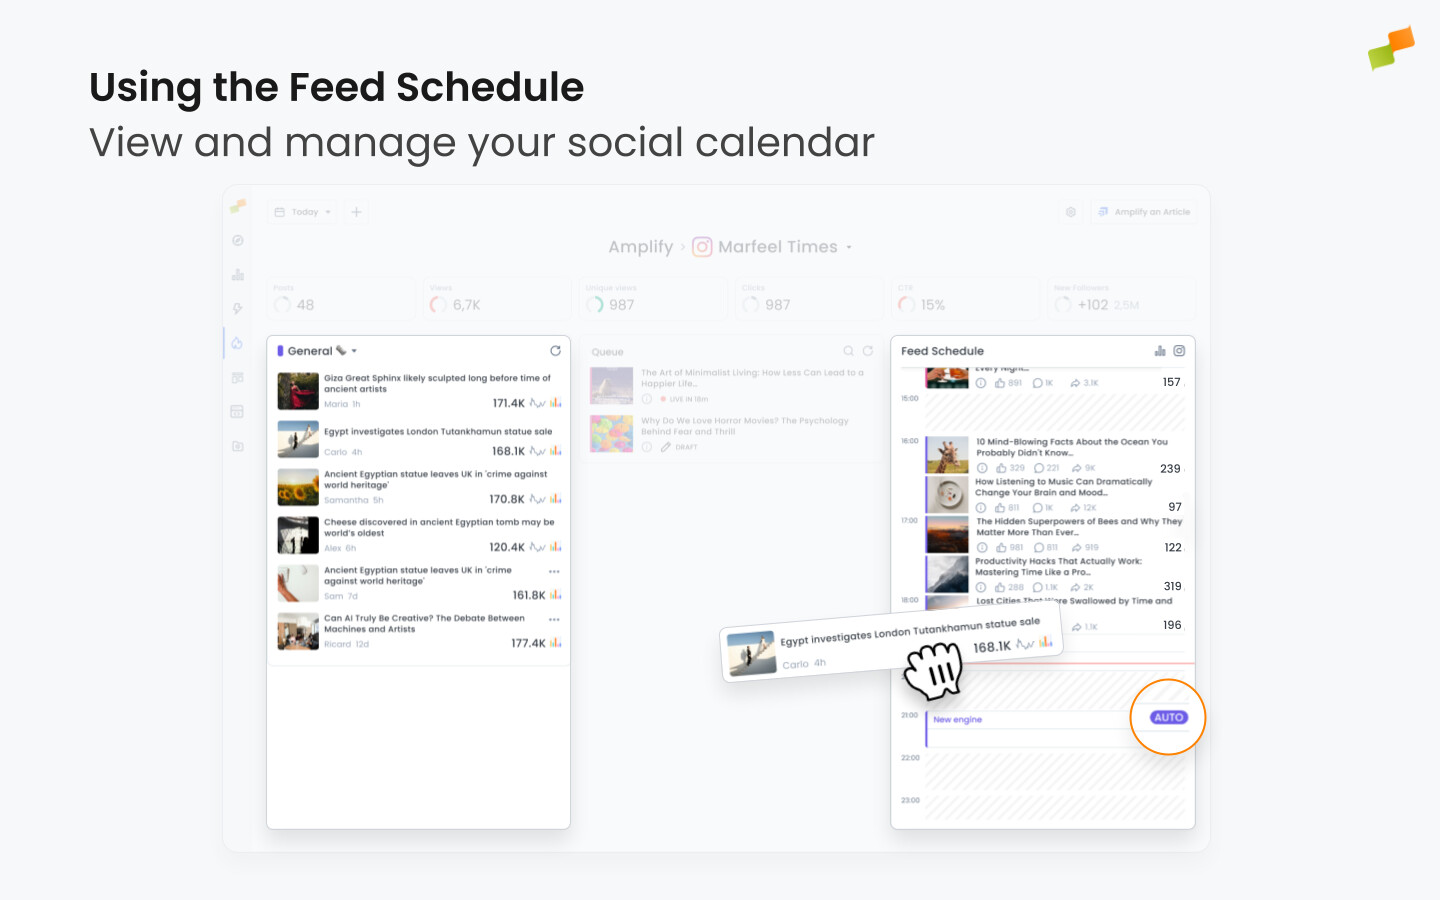
In addition to individual posts, the Feed Schedule shows recommendation engine time blocks. These blocks can have Autopilot mode enabled (marked by the word AUTO) or disabled. When disabled, they set the engine to be used for the Smart Recommendations column during that period.
Scroll backwards through the Feed Schedule to view detailed metrics for previously published posts: comments, likes, shares, and total clicks.
Drill down on Explore for insights
Section titled “Drill down on Explore for insights”Click the metrics icon on top of the Feed Schedule to open Explore, where you can analyze the feed’s performance in detail combined with all other data and dimensions available in Marfeel. More information on Marfeel Amplify: Insights.

What are the four areas of the Feed Details panel?
The Feed Details panel is divided into Feed Level Metrics, Smart Recommendations, Queue, and Feed Schedule. Feed Level Metrics display timeframe-bound performance data with predictive analytics. Smart Recommendations suggest articles based on your chosen recommendation engine. Queue shows posts queued for today. Feed Schedule is a calendar timeline of published and upcoming posts.
What ranking profiles are available for Amplify recommendation engines?
Amplify offers seven ranking profiles: Most Read (sorted by overall traffic), Latest (most recently published), Balanced (broad visibility without over-prioritizing one signal), Popular (weighted toward traffic popularity), Trendy (sharp traffic increases over short periods), Social (adapted to past performance on the specific feed), and Best Posts (highest social interactions from previously posted articles).
How do I schedule posts using the Feed Schedule?
Drag articles from the Smart Recommendations or Queue columns and drop them into the Feed Schedule calendar at the desired time slot. The schedule is fully interactive: you can move items by clicking and dragging. It also displays recommendation engine time blocks, which can run in Autopilot mode (marked AUTO) for automated publishing.